A Flanessian Forest Pond

Sometimes I get so caught up in making everything "modular"  due to the limited space I have for storage of items in the Tower, that I end up creating many pieces that all work extremely well together, but at the same time, limit the scope of my "world."
Cavern terrain is a great example. I have tons of it. It's easy for me to create from DAS clay, or similar plaster, air-dry clay's or the like, it is easy to paint, envision, rough out, and finalize with hues of grey, stone, and purples, and I've written quite a lot about that here (see the "Table of the Underdark" post and earlier posts about modular "Gale Force 9 style" terrain).

But when I envision my "world," the campaign setting, the realm of high, epic fantasy that I create, there is one type of terrain that I imagine more than any other; Woodlands, meadows, rolling green, pine covered mountainous deeply thick forests. Like "Olympic National Park" or "Pacific Northwest" type-forests.


It is hidden within these forests that all the mysteries, the cave entrances, and the secret worlds of my campaign realms usually begin. But sadly, creating forested terrain is tough, time consuming, and especially, hard to store. It takes up massive amounts of valuable shelf real estate due to trees and shrubbery, and lacks the stacking ability of simple rock-like cavern terrain.
But I really needed some more forest type scenery, and missed delving into that realm for projects. So for this latest project, I started small.

A pond.

Now, part of me really wants to make this a bubbling, oozing, dark, cavern-like pool of bleak potential pool of mystery, but I need to remember that this world, my world, is a beautiful place too. So I wanted something that did not necessarily look "deadly" or "dangerous", or even "mysterious." Light shades of greens and blues. Almost friendly and inviting. Something where a great moment of storytelling or action could still take place.

The Base:
For the base of the pond, I started with a simple terrarium piece I picked up at a thrift store. It was a basic, unused lizard water dish I believe, but it was the perfect starting size to make into a water feature. I have also used similar structures in the past as craters, pits, or even Lava pools, as the thick base and sides work exceptionally well with materials like hot glue and such.


The basic grey of the water dish resin took paint well, so I went with a textured stone base paint and this prevented me from necessarily having to do a wash, which kept the stone a bit more on the "lighter" side, and not as grim or dark in its color. Remember, a happy friendly pond here....

Next I opted to do a fill of the pool with basic hot glue. This dries foggy of course, which is fine, as the main feature were looking for here is structure. The glue allows for swirling patterns of waves or water of varying thickness, and since I wanted this to be a slightly "mossy" pond, that allowed me to easily create a sense of "depth" in the water feature.

Next was paint. For this I simply applied acrylic craft paints (most of what I use is of the cheap variety since I treat with a  final coat of specific finish materials anyways). I wanted swirling blues and greens, so this was the portion that needed to be done in several layers to achieve the desired effect. I started with a  basic sea blue, then moved to a  lighter dry-brush of green and finally a wash of a slate blue, allowing the wash to fill in the cracks, and dips in the surface texture, again, adding depth and the illusion of surface material or even plant growth just below the surface.

Lastly, the polyurethane was added in thick, THICK, layers over the dry paint. This allowed the polyurethane to move and flow in a thick, and smooth solid coat over the paint. This also gave the pond a shimmer and a sealant coating which added more depth to the watery look, and also finished off the "wet" look.

Finishing touches came from cutting small plastic reeds from a cheap Ikea faux grass square, and gluing with E600 clear sealant against the lip of the pond. To add additional realism, I used real rocks of the small dollar store plant and flower vase variety and added them with a dab of E600 clear glue to the pond and then added a bit more of the Polyurethane over those, again, wanting the rocks to look "wet."

The final outcome was a piece that looks like it has a greenish hue from moss or plant life just below the surface, due to the Polyurethane creating a slightly yellowish finish over the green and blue paint surface. But it also has a distinct "natural" look that makes me want to keep adding more...usually a sign that it is finished and needs to be left as is. Simple, natural, and realistic looking, not for a cave or some fantastic underdark locale, but for a simple, clean, fairy forest.....

 . 


Jeweled boxes and a Chest of Tiamat!

In an ever-increasing love for all things RPG and especially, D&D, that do not directly relate to the game itself, I started creating a few D&D specific "off-table" items.
At my local second-hand store I often find these large vintage wooden silverware cases used for fine silver, dishes, and the like. They are often constructed from a  thin wood, but have felt or silk linings, and a great shape for storing Wizards of the coast miniatures.
But anyone can put minis in a box.
I wanted to create something that looked like it belonged IN the game, not just something that represented it. This can be used for maps, hidden runes, clues, or magical items as well. The object here was to momentarily take the game beyond just what our characters are doing and involve the players themselves in a real, 3D, tangible world of gameplay, off the table.
We often live lives through small 28mm plastic representation of our being while in play, but with more frequent use of tangible life-size images like this, I hoped to take that one step beyond.

This first D&D box was a simple single compartment affair. Wooden box, red felt lining, and a soft finish to the outside stain; perfect for creating a vintage old-school D&D ampersand symbol with a  few runes. For this box I utilized the original D&D 1st edition, TSR-style ampersand to give the box an "old-school" feel. I left the scratches, wear, marks, and patina to the wood, re-staining very little portions of the box. I really wanted the age to come through and the vintage quality of the wood to be tangible. This allowed the box to "hint" at a history all of its own, adding a sense of realism and truth to the fable that would eventually surround this treasure and its potential use in gameplay.
Where had it been?
Who owned it?
What did they store here?
 Where has it travelled?
What ageless wizard stored his most prized scrolls within this container?
What spell book once graced the blood-red felt lining?
What jewels and tokens of Faurun, the Flannes, or Krynn were once stored inside?


The top lid was carved by hand into the wood, and filled with a gold metallic paint. 
Gemstones and arcane symbols were added to the top, along with 4 large emeralds at each corner and a small but very intense green jewel in the center of the gold oval. Elvish runes were added across the top and gold scripting carved in along the bottom edge of the lid. 


For the inside, I left the red velvet intact, and made a thick, parchment lined lid. The parchment can be removed, allowing this box to work as a prop for in-game play as well.
To add a sense of "magic" to the box, I made a custom ruby and gold handle for the lid. This triangular red gemstone points out from a  gold brass handle with an amazing sense of realism and gives the box a fantastical look.

Finding this first version to have been far more enjoyable than I expected, I wanted to create something that would become a real treasure, something that would last years and hopefully, hold my constantly growing collection of Dungeons & Dragons miniatures. Enter the two-story drawer style Chest of Tiamat. 


Using the D&D 5th edition ampersand as the main focal point of this chest's lid, I began by sanding the entire box down but leaving large portions of the old wood to show through. Like with the 1st edition box, I wanted to retain that sense of "age" and "history." The wood and is pattern, wear, and age, was vital to add depth and mystery to the appearance. Unlike with the first edition box, I removed all liners, surface material, and inside backing. This needed to be truly unique.  


Once most of the original wood surface texture was removed, wood appliqués were added along with the carving of the ampersand. But in addition to the 5th edition Dragon, I wanted to add runes, scripting and even some light Celtic knot work to the boxes lower portions.
The carving was then followed by the long, tedious process of burning in the channels were a thick layer of Citadel Rolled Gold would be added, giving the runes and script work the look of true gold fill, not just paint. After all, this was to be a Dwarven treasure, created to honor, or warn, of a long distant memory or a grave battle with the Demon Queen of Dragons. The gold could not simply be "painted" on. It needed to be drizzled, slowly, by ageless bearded craftsmen deep within the heated bowels of some long forgotten Dwarven citadel and forged by fire, sweat, and pint after pint of Dwarven ale...


Runes and gemstones were then added to the front section, along with the gold metal clasping claws of dragons feet holding large crystal orbs. Two large rubys and a smaller bloodstone adorn the center gold ring along with delicate scripting and symbols surrounding the center.


Large brass handles were added to the outside of the box, both left and right, where the runes and knot work wrap the edges and intermingle behind each ring.

Lastly, a large full-color glossy print of Tiamat herself was added to the inside lid, along with "dragon skin" leather linings to both the top and bottom drawer shelf. Simple felt would not do for this box.
The Dragon skin was found at a local craft store, and measured and cut to size before being carefully adhered to the base of each compartment.

In the end, this box, originally intended as an item to be sold, will likely be placed as a treasure of great value in my gaming tower, hopefully to one day meet the eyes of lucky (or unlucky) adventurers who dare venture into its hidden chambers.

A Tome of Magical Characters and slaying the 3-Ring menace...

Let's face it, traditional table top role playing requires good old fashioned pen and paper, or at the very least, pencil and paper. Traditional character sheets, sheet protectors and folders to hold all the tis bits and pictures and shields and maps and details that a character accumulates over the decades. And there is no better way to simply, cheaply, and effectively keep these organized than in a traditional 3-ring binder.
There will of course always be the tech-savvy fantasy gamer who says "I have all my details online" or "I play Roll20 or Fantasy Grounds and its so much faster and more advanced! This isn't the 70's!" The irony of using this much technology to play in a fantasy realm that is, often times, not a whole lot more technologically advanced (obviously not Sci Fi) than the early 1500's, seems lost...but I digress...

Traditional, pen and paper, actual dice, hand painted miniatures, 3d terrain...these are the things I love about gaming. And I have rambled a plenty on this blog on the traditionalism of good l' fashioned Dungeons & Dragons, but the one piece of equipment that seem to always be at the ready, secondary only to a small pouch-style dice bag, is a folder of some form to keep our character sheets organized. And over the years, mine became so much more than just a portable storage device for multiple characters, maps, NPS's, and magical items. It has become a memory book...a scrapbook if you will...of my years of love and imagination and story telling that makes up the world of Dungeons and Dragons.


As a kid, I felt I really "stepped up my game" a couple decades ago (yes...decades) when I moved from an old Trapper Keeper to a white 3-ring binder with the clear plastic cover on the front. It even had one on the back! So much creative real estate! This allowed for multiple maps, childhood sketches, clippings from old issues of Dragon magazines, and even drawings created through the years. But there was always one lingering detail that nagged at my overly creative psyche: White 3-ring binders did not exist in "my" D&D world. I could get past the cryptic, colorful,  and strange numerological details of a standard character sheet. My imagination chalked these up to "runes from another world" that made up the living breath of my worlds populace. but the binder, sitting there next to an exquisitely detailed dungeon or an elaborately designed miniature terrain tabletop...just somehow killed the "magic" the moment your eyes left the map. And as I have always written about in Creative Dungeoneering, finding ways to "carry the game off the table" is the ultimate goal.
If it were up to me, I'd be part of a group of players that really in truly did come to play in costume...by candlelight....in a dungeon...but I know thats a bit too far for most.

So how to kill this modern tragedy so blatantly present at my table?
This past week, the 3-ring beast was finally played. Forever. And perhaps a new era of creative products will emerge. Surely I am not the only one who desires something more "in-game" with which to transport the lifeblood and memories and maps and details of our many, many creative worlds? And so, the Ultimate Character folder was created....


A Black and gold, jewel encrusted, leather bound, gold-chain-bookmark-hanging-thingy, with charms and runes and big heavy brass buckles that looked like it fell right off a shelf in downtown Waterdeep. 

So for those kind followers on DM Scotty McFarland's Crafts N' Games group, and those who follow and appreciate the generous tips, tricks, and inspiration he offers, I present this quick tutorial. 
Check out the DM's Craft YouTube channel here for even more amazing inspiration and creative ideas: https://www.youtube.com/user/theDMsCraft

+_+_+_+_+_+_+_+_+_+_+_+_+_+_+_+_+_+_+_+_+_+_+_+_+_+_+_+_+_+_+_+_+_+_+_+_+_+_


  Meet my little friend.
He grew up sometime in the 70's when people use to sit around in polyester bell bottoms in rear entry ski boots at the ski lodge and sing Christmas carols along with Andy Williams, Jon Denver, and the Carpenters. Now, his kind can be found easiest at local thrift stores. Is it just me, or did cracking walnuts always seem to be a Holiday thing from the 70's and 80's? At least thats how I remember it. These little tools, now, from what I can tell, are obsolete and unused judging by the sheer number of them available at my local thrift store, but they are FANTASTIC for scraping leather, wood, clay, epoxy, hot glue, and just about anything craft related.

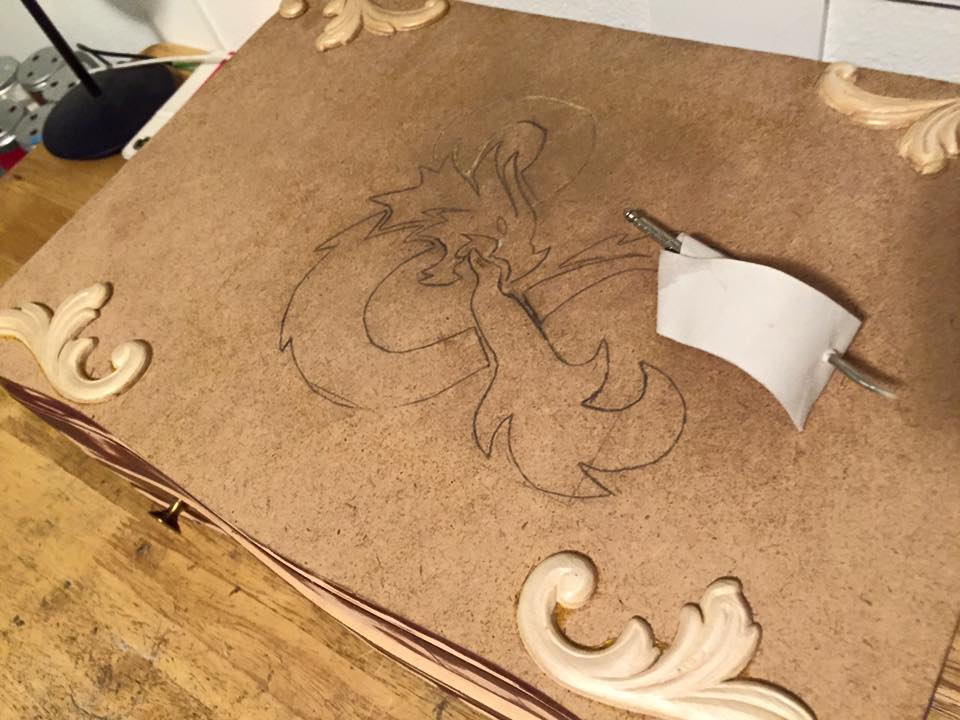
I started with a side of basic leather. I measured the total dimensions of the binder laid flat across the back (outside) and then cut the leather as one large piece, just slightly larger by about 1/8" then the total size (height and width) of the binder. Knowing I would stitch the leather over the top edge of the binder, this worked well and made it even easier to cover up the plastic edging on the standard 3-ring binder. Once the Leather was cut, I researched the Khazad runes (Tolkien) and drew these and the circle, lines, and edging on with a standard #2 pencil. I then used the walnut cracking tool thingy's (I apologize, I have no idea what the correct walnut-cracking vernacular is for these stronger than mithril tools are) and scraped into the runes, tracing over each until the leather was sufficiently carved in depth.

The next step was to lay the leather out under the binder and match up where lace holes were to be punched. This was tricky, and crucial that it be done before the leather was dyed since I was using a black sharpie to measure and plan where the lace holes would be punched. This would be nearly impossible once the leather was dyed black. Plus, I did not want the inside of the holes to show the natural leather color once they were punched and laced. I wanted this "black as midnight, black as pitch. Blacker than the foulest witch" to quote the Goblin Blix.
Holes were punched in the leather all along the edges, but leaving enough to allow for strength. Secondly, holes were punched through the vinyl and cardboard inside, of the binder to match up with the leather holes. the walnut pick tool came in very handy again here at punching through both plastic vinyl and the cardboard interior, and ensuring the holes were free of any dangling bits of plastic, cardboard, or leather.


After the holes were punched through both the cover leather and the binder, it was time to attach the leather straps. These were cut by hand with a  big beefy pair of scissors, and made from an old belt. The straps were attached along with the riveted buckles both front and back now, so as to hide the inside rivets between the binder and the leather cover. Because this work involves hand-hammering the rivets, I wanted this done in the early stage so as to avoid any damage to gemstones or paint applied later.


Tandy Leather brand black dye was then used over the runes and holes, applying it to one side before allowing to dry. I then reversed this, dying about 2" all the way around the other side (inside). This side wouldn't show, but doing so allowed me to cover any potentially visible gaps in the same black leather and give it a solid, clean "pre-dyed" look. Remember...MAGICAL EVIL...or just magic. But all black.


While this picture shows the gems already adhered, I did not add these until the very end. But the runes, post-dye, should still be able to be seen through the dye if they are carved deep enough.


 I used waxed sinew cord (available at most hobby shops, leather supply stores, etc.) and started at the top right side, inside under the leather cover, hiding the knot. I then laced all the way around the edges, overlapping the leather to the inside, over the edge of the binder and continuing with the same single strand until I reached the top of the left side. Pulling from the same strand was tough, and time consuming, but here is why I went this route: The single strand proved stronger, and I could easily hide any knots on the inside of the binder if I was only using one strand rather than multiple small sections. Think of it as a long, long, long....long....shoelace kind of. And again, the walnut cracking tool was perfect for looping under the sinew and pulling tight each strand as I moved from right to left, tightening each and as a result, pulling the leather in further over the vinyl edge of the binder.
Corners were tricky, but leaving the leather to "bunch" a bit on the corners seemed to work great, and give it a more natural look. These corners were also going to be hidden with brass corner edging too, so other than the inside edge, any buckling is invisible.


And this is where the fun started.....
the excess sinew was left dangling at the top, and wooden beads, charms, and magical items were added to the hassles. Lastly, I added a strip of sinew under the three ring binder clasps to adhere a heavy gold braided chain. This would serve as a bookmark and placeholder. This piece looks amazing in real life. Its ridiculously heavy, might be really valuable (I have no idea), but came from vintage jewelry acquired at a family garage sale. It matches well with the brass buckle fittings and the corner edges. 


Map paper stored in the back of the binder along with the traditional "white graph paper" but yet, somehow, they look better with a  bit of medieval bling nearby. 


The final two steps were to add gold metallic paint into the carved runes that were grooved into the leather before dying with the walnut pick. This was done slowly so as to give the gold the look of being "poured" into the runes. A few dos here and there add realism, and I allowed the paint to drip off the tip of the brush and fall naturally into the carved grooves of the leather. 


Gemstones were then added onto the leather with e600 clear glue, and additional black leather dye was gently circled around each to cover the residue of the dried glue. Use caution in removing dried glue, as it can "scrape" the black leather dye from the surface of the leather to a small degree. I found it easier to just cover the dried glue with additional black dye. 

Lastly, a gloss varnish was dabbed over each gemstone. This gave the stones some depth, and also some sheen as they sat embedded in the black leather. 


Gold was added to the spine and the binding, along with a metallic magical symbol on the top, made gold with a  finger tips worth of Gold "Rub n' Buff" paint. 


Safely hidden from the eyes of Eliminster, the travesties of the modern world can be all but forgotten once the tome reaches the sacred table for a nights adventure! 


By the pricking of my thumbs, Something wicked this way comes...

Making dungeon terrain and DM'ing often involves the "pricking of ones thumbs."
They may even bleed a bit. Winter is coming....something wicked always rolls in over the mysterious western mountains we have here, and with it, I begin thinking of the creative energy and mystical call of the gaming table once more.
Case in point, storytelling vs. rules.

Rules don't make for good stories.
Here is an example. Based on a true in-game event (thank you Sam...).

Scenario #1: Rules over Storyline
"Remember that time I moved 5 squares and used an extra turn to move another square and rolled a 20 on the polyhedral die and as a result, was able to remove the main appendage from the level 10 adversary and thus, deplete the foes remaining hit points to zero effectively rendering him out of commission for the remainder of the game?"

See. Boring.

But here's the same scenario when you ask the player what happened after a good nights game, even years later:

Scenario #2: Storyline over Rules
"Remember that time I snuck around the corner of that massive cavern and using night vision, peered into the end of the hall and saw a massive Purple Worm emerging from the crumbling floor of the Underdark, then charged straight at it and rolled a natural 20 with my vorpal sword, and completely severed the entire head?! That was AWESOME!!"


Meet my nephew. Sam. And his brother. Alex.
They had some crazy first-run D&D (3.5 edition) characters. A Dragonborn Paladin with a Vorpal Sword and a Minotaur with a massive axe and a temper.
There was also a human fighter of questionable morals with a pension for Drow rings and a Human Paladin with a Dragon spear and the nickname "Sassafras" too. Both of whom were simultaneously devoured, and then soon after regurgitated by a Gargantuan green dragon by the name of Thraxus Mystcleave...but more on that some other time.

See a few years ago I decided I was going to start playing D&D again, just for fun, with my nephews on Sunday afternoons when we have 8 months of bloody-cold winter here in Utah.
We have this great family ritual where every other Sunday, we all convene like a swarm of hungry, laughing, loud family locusts on my Mother-in-Law's home and partake of too much food, too much noise, a bit of football, and a whole lot of creative little D&D scenarios.
But when Sam and Alex were younger, what I wanted to give them the "imaginative hook" that was D&D, was a good storyline, and the understanding that in this world, you can do, be, and create, anything you can imagine. there are no game borders. there are no "bosses" or "level quests" or strict roads to take to move on. I did not want them to think of D&D as a flood of rules and regulations of what you "could" and "could not" do in this imaginative world.

This is the only way D&D will ever be better than video games. EVER. Sorry fellow old-school role-players...but digital media is catching up. But....it still will NEVER ever truly catch up to our own imaginations and tangible, realistic, three-dimensional terrain and hand painted miniatures.
No amount of pixels, virtual reality, or first-person, point-and-shoot-interaction with complete strangers will ever hold a candle to the worlds and infinite landscapes of the human mind. And THIS is what makes D&D better...forever...than Video games. ANYTHING can be done in the D&D world. And there does not need to be a rule for everything....this is why 4th edition failed.
Our entire lives are governed by "rules."
Taxes. School. Jobs, Laws. Signs. Bills. All of it.
In the D&D world...in the world of the mind of every single DM, lies the potential to completely remove all of these blockages to infinite realms of wonder.
What there DOES have to be is a storyline...a purpose...a memory...and that is the weight and responsibility and job of a good DM.

Make memories. not rules.
Storyline. Memory. Laughter. Tongue in cheek seriousness.

And more cloaks.
DM's should wear cloaks.
Sorry. You just should.
Preferably green.

Like this:


...back to The DUNGEON!!!


BACK TO THE DUNGEON!


Some scale photos of recent projects utilizing the Caverns of the Undertable project...
(creativedungeoneering.blogspot.com/2015/01/caverns-of-under-table.html )


An overview of the general layout of the dungeon. Placing encounter miniatures within the gaming areas, while the most imaginative and enjoyable part, can prove to be a bit underwhelming if revealed too soon. Thus, much of the dungeon, while visible to players on a massive, wargame-like-scale remains empty at first view.  

 A player character's figure makes his way down the stone steps beneath Cahz-Caligh' into the long dungeon hallway. Visible past the rock walls and jeweled rock formations lie the ruins of an ancient temple.
I always try to keep pathways wide enough to give the sense of "expanse" or size, breathability or "realism." while some passages are perfectly designed to be narrow, single-line advances in movement, I wanted this section to provide room for combat at almost any point.
When creating the under table environment, I used a varied surface color allowing for various plot lines. this could be both a rocky stone floor, or a mirky watery tunnel, and colors could serve well for either purpose.

A brazier with flames - made from a wooden door pull and a bit of dried hot glue. I painted the barrel shape with a charcoal black and dry-brushed with a licorice for a more worn, "old-iron" type look. I then painted the epoxy in varying levels of intensity with both yellow, red, and highlights dry brushed in orange. I have found that when painting epoxy resin's such as this, starting with a thin base coat of yellow allows the clear surface of the resin to almost highlight through, giving the flame a sense of life and movement. 


Sentinel statues (or potential traps?) stand watch over a dilapidated stone archway, detailed with ancient runes inset. Each sentinel is a simple plastic "Cuthulu" miniature, painted in a stone grey and washed with a black before being dry brushed in a slightly lighter grey shade. The Combination of the three paint layers provides the look of old stone, mottled and dirty. The archway was sculpted from DAS clay available for an affordable price at local hobby supply shops, and then painted in various layers of stone shades. The runes were sculpted into the clay giving only a very slight hint at their presence. This allows the DM to either decide to use these or not, depending on storyline. Multiple options, multiple story hooks, and multiple game uses, all each potentially different and unique. 


From within the arch lurks in the distance, the larger main cavern, and a lurking black pudding, perched against a craggy stone corridor corner.


The old temple ruins at the far end of the main hall reveal a damaged sarcophagus and ancient pillars. Again, the cavern floors color variation serves well to give the hint of old stone, while allowing mystical color waves of purple-hues to come through, witch for my dungeon cavern set, matches the Gale Force 9 Underdark set well. 


In the distance of the cavern lies a large mound (War Torn Worlds, from their fantastic Places of Mystery line), past the crystalline stalagmites  (made from epoxy and painted in silver and amethyst metallic hues, sealed with a  clear gloss) and through a glistening stone floored chamber. This reflects the slightly "shiny" floor of the Undertable under dark cavern model, allowing the surface to replicate water or smooth stone with varying colors. 


Sentinels, in a larger scale, matching those of the early passage way made from Cuthulu miniatures. These are larger scale models, but serve as great statues for modeling, and in an Underdark setting, are eerily similar to the D&D Mind Flayers. these were similarly painted in a rough stone grey color, then washed with a light black wash and dry brushed with a lighter grey to create a stone look similar to that of the terrain used throughout. This "modular" effect initiated from the beginning of every project allows infinite combinations of all terrain of multiple varying size and form, and yet they can all be put together in one giant set as well, depending on game and module size. The stone mounds are from War Torn Worlds, and the base cavern is actually a re-purposed reptile tank accessory, dry brushed in grey and purple hues, again, to match the other pieces of terrain. 


Lurking around the corner crevice beyond the Gale Force 9 stalagmites set is a waiting Purple Worm. This si from the wizards of the Coast line. In the foreground is a series of crystalline stalagmites made from simple chunks of dried hot glue and a basic cardboard base, painted to match the GF9 counterparts. The large mounds beyond are from the recycled rubber line by War Torn Worlds. 


The top of the War Torn worlds Places of Mystery Altar serves well as the pinnacle of the adventure, where the Orcus cultists are bringing to life the Aspect of Orcus with the required human sacrifice. All minis by WOTC.
While the dungeon is fun to build, and even more fun to run adventures through, The sides of the dungeon need work. When players look "down" onto the game table I want the sides to reflect the environment they are in. Side walls will be an upcoming project to hide the room this is set up in.
Lighting is also something I am still working on. Dwarves Forge of course does an amazing job with their ads for their Kickstarter Terrain with music and lighting. Some of which I hope to emulate in future projects...

The Dragons Head...Completed...

A Busy project weekend....
Here is what this started out as in the previous Dragon's Head Post:

-A thrift store toy elephant - $.50 (unused for this project...I have a hard time creating fiends out of such beloved animals...)

-An incomplete thrift store toy catapult - $.75

-Plastic bicycle cassette holder - free/recycled

-Cardboard construction paper tube - free/recycled

-Additional elements included paint, glue, and an old thrift store plastic dragon ($.50). Everything else was from recycled or re-purposed bits of scrap, wood, metal, chain, and paper.


The key to this whole project really was the plastic bicycle cassette holder. I am an avid and long time competitive cyclist, and geek-crafts and table top gaming were always the perfect way to spend recovery time growing up. A bit vintage now, and no one would ever guess at my "secret life" as a hard-core D&D geek and collector, but its amazing what bits of plastic, metal, wood, and paper can be made into given a slight "twist" to the perception. 

Some background on the Dragon's Head project:

 At a recent thrift store scavenger hunt (which seem to happen almost weekly) I ran across this partially-intact catapult. While it's far too large for 25-28mm miniature scale, it did make for a perfect size massive" accessory. But it was needing one crucial element...a personality.
From the depths of the Ursus templars Tower I found an old plastic Red Dragon; chubby, a bit "fairy-tale" looking, and spouting a long plastic lien of poorly painted fire. The perfect candidate for "adaptation." Originally about $.50.

My compiled parts list then became a conglomeration of a discarded red dragon's head, an old plastic bicycle cassette holder, and a cardboard tube. When blended together with some old plastic decorative teeth beads, a few small wooden barrels, and some bits of discarded jewelry chain draped over a small wooden dowel of wood, the form of The Dragon's Head began to truly take shape.

 The plastic dragon head was added to the front of the "ram" made from a standard cardboard tube. The ram was needed to look like a massive heavy tree log, but shaped, scolded, worn, and sued for countless raids and sieges, not a freshly cut pine trunk, but an actual instrument of war and destruction.
The cardboard was first lightly sanded, then scored with a small metal pick to give the deep grooves of tree bark and wood grain.
It was then painted to look like a huge heavy battering ram with a  solid base of wood brown and dry brushed with a darker shade of chocolate brown.

An end cap of cardboard was added to the rear to flush out the base of the ram's trunk and the dragon's tail was adhered with epoxy to the back for a decorative effect. Perhaps to be used for pushing the ram forward into large wooden castle gateways and portcullis's.
When parted out, the front claw of the dragon also proved useful to add a decorative hook for the front of the ram as well. Again, decorative utilitarianism was the look I was going for here. A fantasy device to be sure, but one that had seen heavy use and some descent amount of ware and tear.

 With heavily detailed projects like this I always like to think "it's the little things that kill" or, at the very least, "it's the little things that make it real." A bit of extra rope hanging off a stub, an old exposed rivet in the side, chain dangling carelessly off to one side...the real workings of a piece of war machinery but in a somewhat more "industrial" style since this is primarily a dirty nasty weapon of Orcs and other foul things.

 The Dragons head, while menacing in it's red colored scales, needed to look as if it was made from the same gritty iron as the large frontal ram spikes. I used a charcoal/licorice colored paint and then added dry brushed silver to give the spikes, the dragon'ss head, tail, and even front claw hook a light shine, like the look of old iron. A thick layer of epoxy was allowed to drizzle and drip and flow around the dragons head making it easy to keep it attached to the front of the ram within the spikes, but also to give it the look of molten brazen iron welds as well.
Such minuscule details are thought out and planned, but oft do not come out as visible as I would like in the photos. But ideally, these contraptions are for players, in person and at the table, where these minuscule details can add a sense of realism and wonder to the tabletop universe when viewed with the eye.

 An example of the small details that add this sense of "tabletop realism" is where the battering ram chain loops through a small ring atop the wooden swing arm, giving the impression of real function over form. The ring is actually a small removed bit of the same chain used for the pull chains on the front, but cut in half and glued to the wooden support beam, then painted to look as if it has been bolted into place.
The detail on the "wooden" ram made from the cardboard tube shows the effect of the dry brushing over the sanded and shaped cardboard beneath.
 The large "Dragons Claws" add a menacing look to the sides, and add some stark, angular features to the roundness of the wooden wheels. These are made from simple cheap plastic decorative bear claw beads, available at most hobby, craft, and even Scouting shops. They were cut flat, sanded at the base lightly, and adhered to the structures axles. The shiny black plastic was dulled with varying layers of silver paint to give the look of forged iron and rusted metal.

 You can never have too many small vats of fire when it comes to creating machines of war on an Orcish scale. The small wooden drawer pulls, turned upside down and field with epoxy takes on the shape of flaming pots of fire, ready to have arrows dipped and lit for the coming assault. Layers of alternating coloring in a yellow, and dry-brushed red and orange give each pot a flickering, almost unique and carrying feel. Also note that the epoxy was allowed to dry at a slight bent angle. This gives a slight sense of motion to the direction the device would be moving, with the flames arching ever so slightly backwards towards the aft of the machine.

 Just for size comparison, the device stands quite tall when compared to standard 28mm WOTC D&D miniatures. these three are a standard Aasimar Paladin, Redgar- human Fighter and a human Ranger.


The frontal chains fit eerily well into the raised slashing claws of two trolls from the WOTC D&D line, followed by the Human Torturer mini with raised whip. Background noise aside, the device is just a bit large for a small room tabletop battlefield such as this one, but creating story hooks from the advancing horde is easy enough...

From the outskirts of the small forest Castle, the Orc army begins to emerge from the barren hills beyond. 


Darnehelm Lord of Mur Crag balks at their initial advance, paying no heed to the hordes beyond, or their giant war elephant...