Showing posts with label Dungeons and Dragons. Show all posts

Sci-Fi Terrain!

Sci-fi terrain (Star Wars, Warhammer 40K) is TOUGH!
It hurst my brain...like algebra or 9th grade math. My modeling style naturally falls into forests and caverns and crystals and trees and mountains and all kinds of organic creepy crawly shapes and forms.....
But not angles, lines, boxes, widgets, buttons, and "greebles" as I've heard them called before (small accents that look like they have a function but in reality, do not).

So in creating Sci-Fi terrain for Warhammer 40K and Star Wars RPG use (although I do not currently play SW RPG, but would someday love to...), I found it tough to make the mental switch from one genre to the next.
I needed help. a computer. Or maybe just a broken jacuzzi motherboard.

This turned out to be just the inspiration I needed. I had no problem coming up with "shells" that looked like they had "futuristic potential," but it is the small fine details that made the difference. And this old leftover piece from replacing a jacuzzi spa heating system was perfect.
Wires were used throughout as well, cut and shaped, and even the ends made for interesting lines and edges to give each part character.


Ion-Relay Pipe:
This was made from a  heavy base of actual brass pipe, with various small parts scavenged from sprinkler repair.
I added the white plastic ring at back (the inner workings of a fake (I hope) TAG Huer wristwatch (purchased for $3 USD on some Bangkok street corner), a small wrap of wiring on the front, and a nozzle from a foam fishing bobber cone, inverted and screwed into the plastic gray pipe.

Bits were added to the top from cut wire ends, small beads, and even a few plastic bracelet pieces from my daughters nightmarish craft horde. Small white side pieces and base bits were ripped from the circuit board, all of which I am far to dumb to identify...but they look great when primed.
Edges, small holes, squared lines, and architectural structure that implies meaning or purpose beyond the need to understand.


Fusion Relay Station
This one turned out as the biggest surprise thus far.
I threw this together with extra parts thinking I'd just see how it turned out, and it's ended up being one of my favorite.
I started with two round foam fishing bobbers, and inserted simple coffee straws as antenna into the top, giving each a different height for some visual depth and detail.
I then fixed a small brown ring handle from an old cardboard shipping box in between the two, cutting a slit into each foam side, and creating a form of "window" or control screen.

Once I added the small circuit pieces and battery parts to the top, sides, and front panel of the base, it started to take on a very 'functional' look, as if each piece has a purpose, we just are not entirely sure what it is. Thats the essence of a good greeble I think.
When primed, the foam takes on a  slightly pitted look, giving it the finish of old plaster, sandstone, or stucco.
Perfect for a desert or deteriorating structure on some far away world.


Part 2: 
Trooper Outpost, Planetary Beacon, Carbon turbines, and Ruined Tower and Scrap Heap.


More Trees than Tears in Flannessia...


I do a lot of solo RPG gaming.
Almost entirely.
Mostly because I haven't found a group consistent and committed enough in my immediate area for any form of regular play. And so I build a lot of terrain for that specifically, that can be used modularly to help generate a better idea of the imaginative world in which I am playing the game. Of all the terrain I make, trees are by far my favorite. I never feel as if I can have too many.

Sometimes a small encounter is perfect though, and for that, a bit of extra foliage and even just a small scene-scape can be ideal. Not only can it add to a greater forest diversity when used in with larger terrain, but on it's own it stands as a unique scene. For this use I created a small scene with only two small aspen trees, a small base, and a few natural stone accents with surrounding foliage.

I started with two strands of small wires, and banded these together with simple electrical tape. From the tops of that I added actual wood strands in smalls tick like branches, gluing each individual stick onto another to get just the right natural look.


Once I had the sticks 'bound' together and the basic tree form assembled, I added more masking tape, winding it up and around the trunks before adding a cream-white colored paint (rather thick) to the masking tape itself, allowing the lines of the masking tape to show through just a bit to give the look of bark and natural wood grain. 

This was followed with a  charcoal colored paint dabbed in varying sizes to give the aspen-like illusion of knots and divers in the natural wood-the 'spots' look. A very light dry-brushing of a softer tan over putter edges of the branches mirrored well the changing look of the flocking added to the tree tops too.


Instead of going with completely green as I have done in the past, I added in flecks of lighter almost, burnt, coloring to give the look of changing leaves, or maybe a bit of natural tree fungus, disease, parasite, etc.


The base was made with my go-to material: thick foam-core in black with paper-backed edging (called Gator board in the Design/Advertising world), and carved first with a simple hobby knife for texture and stone, then flocked with a mixture of green foliage made from a combination of pencil shavings, standard pva glue, green paint, and light bits of green food coloring.
Applied over a thin layer of painted-on pva glue and allowed to dry before drilling the tree holes allows the flocking to run right up to the base of each tree trunk.


Finally, I added a few small natural stone accents (to give the base weight0 and surrounded the tree trunks with standard hobby-shop floral lichen.

Finally, once completed, the stone edging of the foam board was painted in three layers of alternating gray:
1: A darker, deep gray in vertical strokes only.
2: A lighter stone gray in sideways lightly applied strokes, allowing both the black of the foam core and the gray of the previous layer to show through ever-so-slightly.
3: a dry brushed layer of light, almost white-gray over the top giving highlights of natural granite.

The result is a small little grove, single forested encounter piece, or modular tree stand for use alone or in conjunction with additional tree pieces.

As Cavalier Elrik once said, "There are more trees in Flannessia than tears. Pray it will always be so."


Where the Whales Go To Die! Part 2!!!


So I originally wrote about a project a while back that I started titled Where the Whales Go To Die, based off one of my favorite movies, The Island at the Top of the World. (http://creativedungeoneering.blogspot.com/2016/03/where-whales-go-to-die.html)

This was a fantastic movie done by Disney back in 1974 with a lot of advanced special effects for it's time, but it really captured a love for all things "arctic" and especially, for classic adventure, travel, mountaineering, and even Vikings and 'Killer' whales.
I never did a follow-up to this project though to show the finished product, which I think turned out not half-bad!

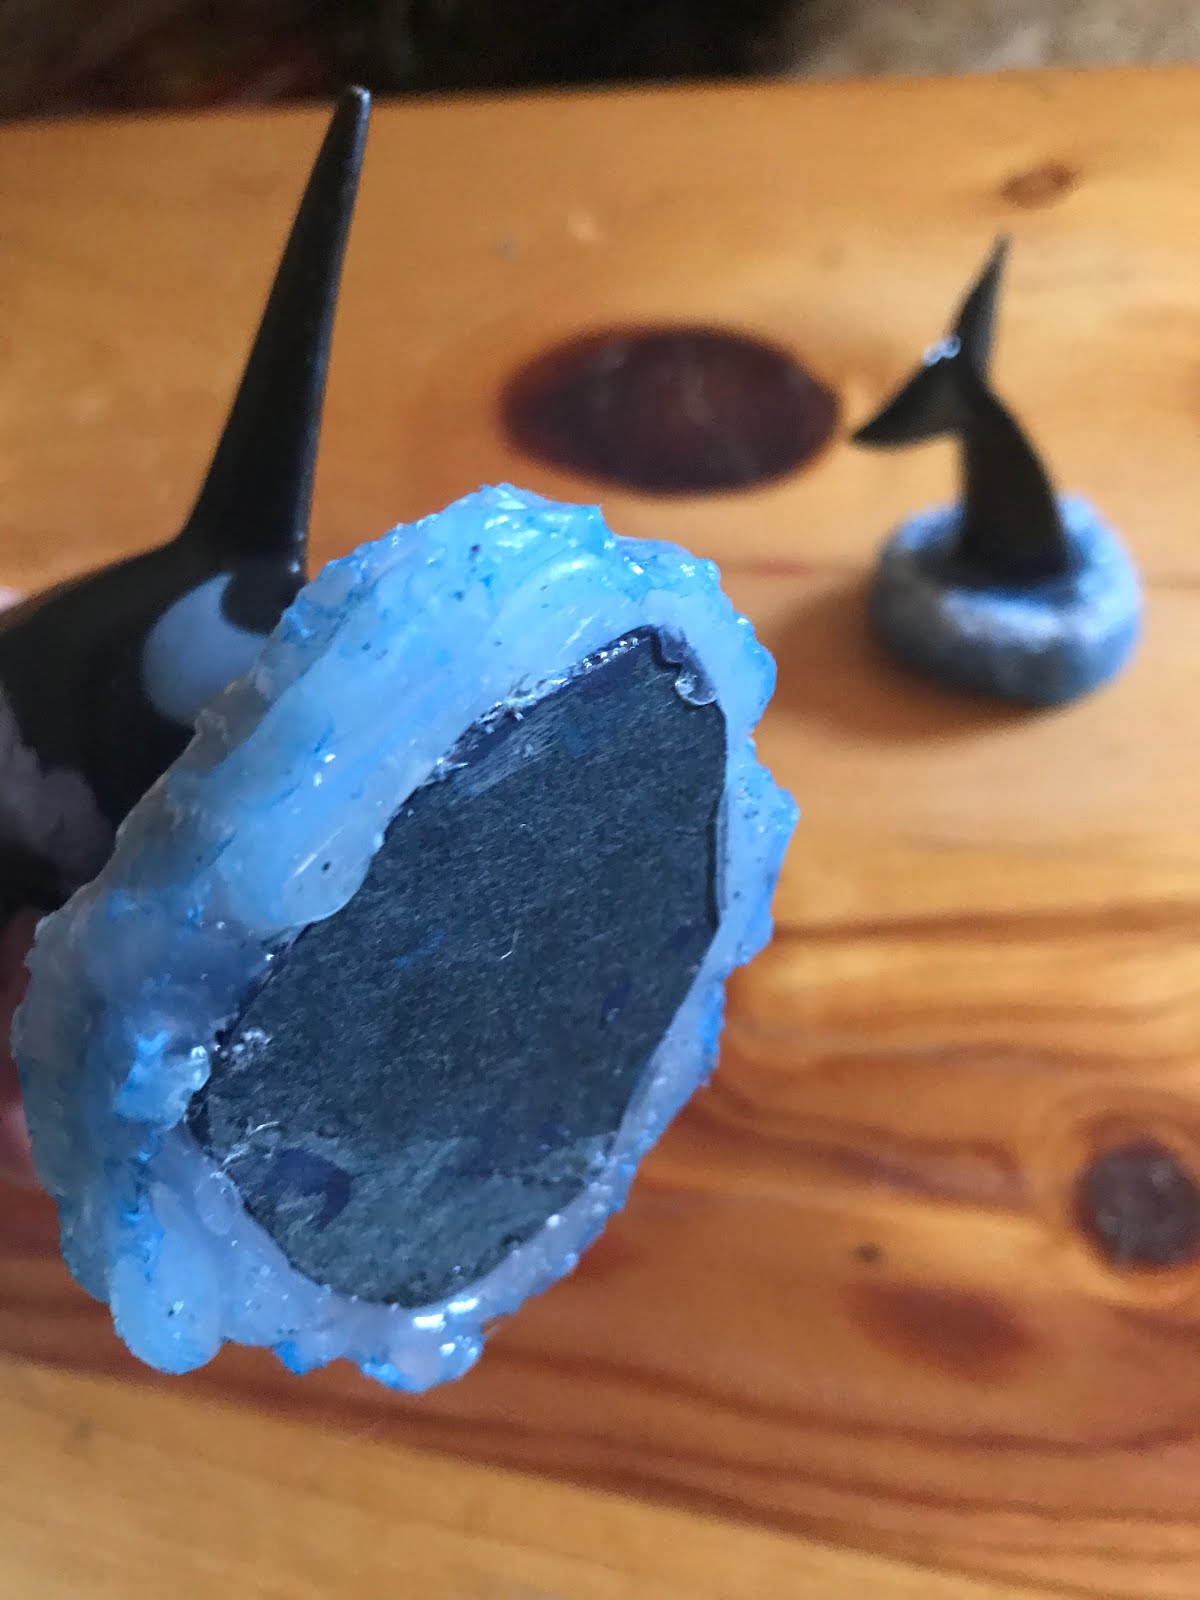
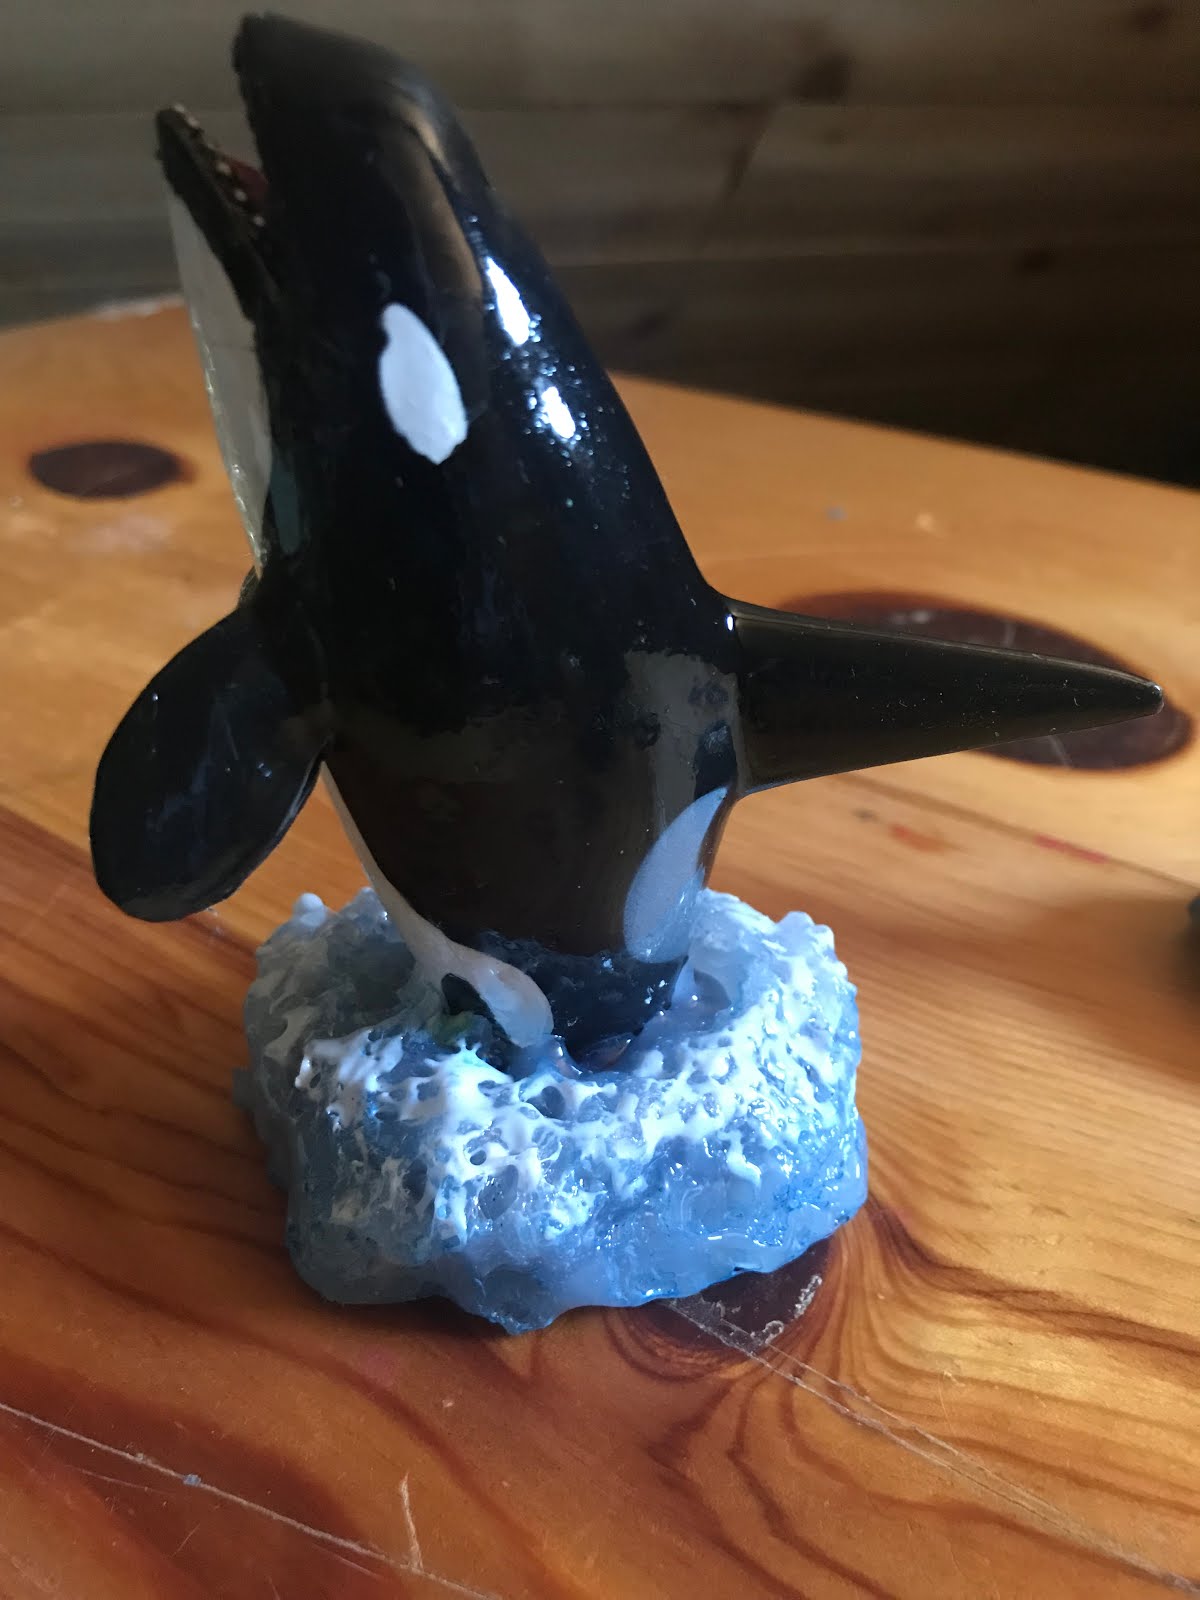
I started with a toy Orca, and wanting to give the illusion of it coming out of the water, cut it in half. I created the base with a thick card-stock base and a platform of sculpted hot glue. This is done by allowing the applied hot glue to cool just slightly while sculpting the glue into the shaping desired.

After I started to get the base shaped right, I sunk the Orca's top half into the base, and continued to apply. This next crucial step is what really creates the sense of 'frothing foam.'
Wanting to replicate the scene from Island at the Top of the world where the Orca's that guard "The Place where the Whales go to die" is covered with an icy foam and misty cold arctic water, I added a dab of Gorilla glue to the still warm hot glue.
The chemical reaction between these two creates a beautiful (if not slightly over-abundant and out-of-control if not watched!) foam. This created a textured foaming circle of splash around the base of the whale as it crests out of the water, just as in the attacking scene from the film.


Loving these beautiful creatures I feel it imperative to emphasize here that these are designed for fictional table-top roleplaying of course, and that there are no recorded attacks of Orca's guarding "the Place where Whales go to Die" (that I am aware of).


(See a brief sample of it from the original film here:
https://www.youtube.com/watch?v=bh lOekZYMk-


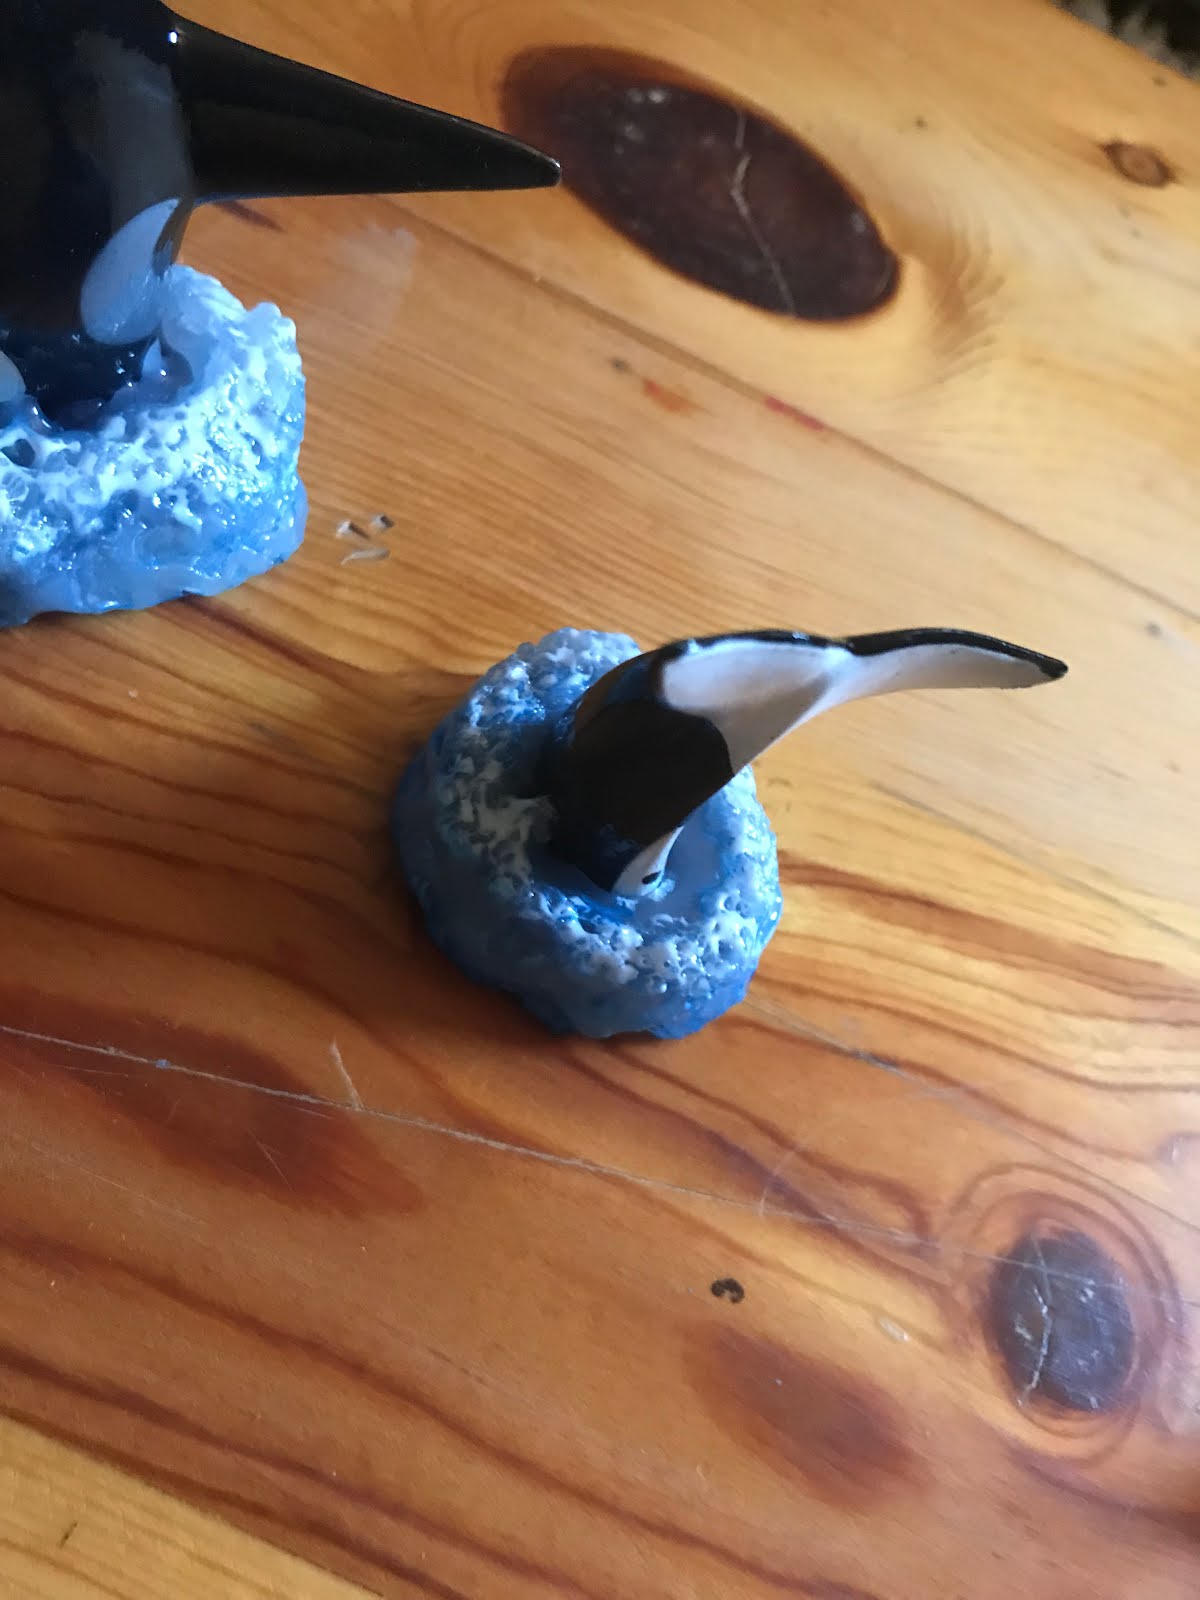
Following the same technique for the fluke, allowed me to both create either a ridiculously large single whale (unlikely) or two whales that could technically be used for an ocean-based encounter simultaneously.

A similar base structure, and frothing technique was used allowing two natural encounters to be created from one single miniature.


Creating the underside of the whale was a bit more tricky as I wanted them to look natural (no "made in China" lettering" and yet scarred up and aged, like ancient creatures of legend. Matching the coloring of the white was tough, but adding a "gloss" look of being 'wet' was even tougher without the plastic looking too shiny.


All in all one of my favorite custom-made pieces. This has yet to eb entered into a contest as many of my other Creative Dungeoneering pieces have, but will likely be competing in a custom-made category this year at the SaltCon gaming convention:

http://saltcon.com


Three levels of Adequacy


Adequacy.
Something that works...well...adequately. 
And when it comes to gaming terrain, and the fact that I am primarily a solo RPG'er, adequacy goes a long way. 
I don't have a "huge" space for gaming. I hope to, one day, turn the lower level of the Ursus Templari into a traditional gaming area. But until a suitable group of gamers can be found, (I am skeptical of that ever happening, as my "ideal" requirements for a solid group would likely be so out of touch with reality that I doubt any players possess such specific creative requirements) the "Tower" or the upstairs portion, serves as the primary small gaming area. 

One of my favorite pastimes above and beyond even the actual "gaming" portion of table top RPG's is the setting up, creating, crafting, and building of miniature terrain and 28mm worlds.  But in a small space, that can prove challenging. 

Add to this that I have additional, more expensive hobbies, and the allotted space gets even smaller. But again, it's perfectly "adequate"for solo RPG's and for even small 1 to 2 player games. But the key here is "levels."

This shows the 4-level campaign world for the next build, each "level;" going deeper and deeper. This could be replicated onto a larger tabletop, but with no real solid group of players, it works "adequately" for solo RPG's in a pre-set 3D Terrain world.                                                                                                                            Our storyline for this world starts with the adventurers having hired a wagon and horses from the nearby town, where they are traveling towards the ancient tomb lands and the ruins  of a once fabled kingdom, now long-forgotten and believed to be little other than a scattered set of forest ruins.  


Across the old King's Bridge lies the forest of Andulüth, where once sat the Elvish fortress of Tar Avinon. The bridge, crossing over a meandering bog, fills the distant woodland with a thick mist, the ruined walls barely visible beyond the damaged cobblestone and crumbling borders. 


The forest tabletop was made from an actual table piece, where I have utilized the underside of a flat black tabletop (again, the emphasis on saving space) as a forest-colored surface. This was done by creating a textured spray layer onto the underside and then hand painting with a  forest colored mixture giving the surface a generic green, brown, and forest mottled texture. 

While this works, it's nice to sometimes just use standard grass matt, sized and cut to the shape of the inside of the table, as pictured here. Accessories are hand made and also include elements made by 
War Torn Worlds (one of my all-time favorite war game terrain companies: http://wartornworldsstore.myshopify.com
They're customer service is amazing, shipping is solid, fast, and friendly, and their prices aren't bad. and the terrain is just bombproof and very, very nice looking. Just can not say enough good things about these guys. 

Ok, so back to the story...err...adventure:
So over the small pond and looking west into the forest are signs of the once great kingdoms downfall. The distant spires of natural rock, and the two Elven trees, now burnt and black with foul magic from the wizardry of the Goblin cults.

So I LOVE trees. LOVE THEM!! Every adventure in my world starts, ends, or passes through a forest. Not sure why. And of all trees, pines and high mountain evergreens are my favorite. But getting these to look just right by hand-making is tough. Mine often end up looking more like eucalyptus trees, or at best, lodge pole pines. Not bad, but not very "lush."
At my local hobby store, I can purchase a cheap pack of snowy Christmas style trees for $1.99. I soak these in warm water for several hours, sometimes overnight, and the snow dissolves away, leaving a very "blue-green" pipe cleaner in return.
So to combat this, I spray them with a nice matte forest green spray paint, but don't add any additional flocking. I then put these on sculpted foam core bases, and add stone accents and coloring, and have been pretty happy with the result. To add weight, throwing a glued pebble or dollar-store rock onto the base help stabilize the weight too.


The pond is actually a small terrarium lizard pool, filled with hot glue, painted, and then sealed with a thick layer of Minwax Polyeurethane to give it a greenish gloss. Notice the actual stones added at the base and edges too. These come from a simple dollar store bag of flower arrangement rocks. I added bits of foliage to the edges, and used cropped pieces of plastic IKEA grass for reeds. Cutting the reeds at different lengths gave them a more natural look and feel too, and allowing them to slip and slide a bit when glueing them into the sealant also helped, creating ripples within the drying sealant over the dried hot glue. 
INTO THE DUNGEON....

For the second level, underneath the forest floor and through a cavern rock piece above, the characters enter the large cavern dungeon down a winding set of stone pillars on the left. 
The majority of the enjoyment with creating these pr-designed layouts is imagining the stories to be had at every twist and turn.
A combination of hand-crafted and Dwarven Forge brand cavern terrain is used together, along with accents from war Torn worlds. 
Of course everyone knows Dwarven Forge, and as much as I love War Torn Worlds, Dwarven Forge is just epic. Albeit, pricey.....


DEATHCAP MUSHROOMS......

Wizards of the Coast makes a fantastic pre-painted miniature for the Death Cap Mushroom
And I have even made hand-made versions of these to match previously. But I wanted some that were larger. FAR larger. At my local Hobby Lobby I found a set of 4 mushrooms, actually designed to be a mushroom table and chairs set, in the garden and floral section.  these were perfect for large, overgrown mushrooms, and with a  bit of paint and a nice brown stain, they look the part for an overgrown mushroom forest.


From the far side of the cavern can be seen the magic door to the lower levels, and the winding stairway leading from the central dungeon chamber to its wide balcony. Both of these were made from foam core, sprayed in a stone texture spray paint, and then added with bits of green and especially, purple, to match the Gale Force 9 Dungeons & Dragons caverns of the Underdark adventure set. This allows hand crafted pieces top match seamlessly with the pre-generated pieces. 


The third-level layer is another small modular table reached by a bridges and is not yet complete, but allows the dungeon to grow even larger, or to be broken down into small areas of specific adventuring sections. This will likely be surfaced with a  textured matt beneath, giving the illusion of a stone floor to the upper caverns, and emphasizing a structured city or ruined temple at the very lowest depths. Perhaps even a Draw city. 

Modular dungeons, for group, and especially, solo play can be fun, and also challenging,. If for no other reason alone, it allows us, as Dungeon Masters, to use our own creative juices to generate potential storylines, plot twists, and side adventures for our players and add to the rich and growing story that every game group brings to their own particular realm. 


BUT FOR OUR ADVENTURING PARTY, THERE IS YET STILL MORE TO COME...


Bubble, Bubble, Boil & Trouble!


So I am a huge fan of The DM's Craft YouTube videos and the DM Scotty Crafts n Games
Facebook group, and can't say enough good things about the folks you'll run into over there.
What an amazing group of talented, inspiring, and sincerely uplifting people. Go check them out here:
https://www.facebook.com/groups/dmscottyscraftsngames/

And subscribe to The DM's Craft, Scotty's fantastic tutorials, found here:
https://www.youtube.com/user/theDMsCraft


So one thing I've heard DM scotty say that I really like, is to have terrain focused on "playability." Here at Creative Dungeoneering, I love creating other worlds even more than playability, but for some pieces, they both work wonders.
And such is the sad, creepy, and quite bubblingly-terrific tale of our recent acid pool creation!


Now...to be fair, this was created a while ago, but it was perfected  this past week with one of my very favorite forms of Craft Alchemy (I should copyright that name!!!)...


NO! Those aren't dice you see in his hand (actually they are....), but the perfect blend of bubbling, acidic, character-eating (in the game only) froth can be achieved with the double-whammy power of the following components:


Hot Glue and Gorilla Glue! The perfect chemical mix to create frothing, bubble effects that both accept paint and resist collapse.              


Now I've done a tutorial on these two before (see the post on Gelatinous cubes and the nostalgia of the Water Weird http://creativedungeoneering.blogspot.com/2015/03/gelatinous-cubes-and-nostalgia-of-water.html 
BUT, I have never really used them in a painted scheme before, so this was a new attempt at creating texture and versatility. 

After creating the tile from standard black foam core (this was done by carving into the paper backing of the foam core but leaving the paper intact on the top), I sprayed the surface with a standard textured spray paint (stone gray) and proceeded to fill the pre-carved pool cavity with plain, clear hot glue. 

The pool itself was carved into the foam, but not all the way through, leaving a thin but sturdy layer of foam beneath to support the weight of the hot glue. I also ran hot glue along a few of the pre-carved cracks to give the impression that the acid in this dungeon tile was bubbling through. I also added over the final dry stone texture, small read of purple. 
Why purple? 

Because I am a huge fan of modular, and mostly, "store-able" terrain. I don't have a ton of storage space devoted to my gaming area, and since I own two sets of the fantastic, Gale force 9, Dungeons & Dragons Caverns of the Underdark 3D Adventure Set terrain, I wanted this piece to go with it. 
The Stalagmites for the Underdark set come in a pre-painted purplish hue, with the tips and the adjoining pools and crystals done in a magnificent amethyst tone. By adding a small bit of "cave alge" to the edges of my tile, I could easily transition from one area of the cavern to the next, and maintain a sense of visual flow and realistic geological coloring. 

Once the glue was set into the pool, I immediately set to adding gorilla glue. This CAN NOT be overstated enough. I use High-Temperature glue most of the time, but have found that all temperature glue works well too. But before that glue dries, and while it is still warm, add drops of Gorilla glue over the top in a nice clear and thick layer. More Gorilla glue for more bubbles, less, for less. You will not see this foam up right away. In fact, it takes far longer than one would think. But over many minutes, and usually a day, the foaming action can grow to almost out-of-control proportions. If it does, however, it cuts away easily with a simple exact knife when dry too.

The final effect, after painting, is a very textured, and foaming consistency. One very crucial key here though is sealant. 
To keep the bubbles formed, and keep the paint glossy and nasty (in this case) looking, I use a small bit of basic sealant. 
NOT spray sealant, which seems to have a horrible effect for some reason, deteriorating and dissolving the consistency of the texture and paint, but actual brush on sealant by Minwax. I prefer the small can of fast-drying Polyurethane, in the clear gloss, as I use this primarily for wet surfaces and moist looking areas. This also tends to leave, when added in heavy amounts, a bit of a greenish film to it, adding only more to the look of charred, melted toxins bubbling and frothing about. 

Stay tuned to Creative Dungeoneering for some amazing new highlights we have coming up! 

We will soon be opening our official Creative Dungeoneering Etsy shop, our YouTube channel with all kinds of random fantasy, craft, and geek related posts, and of course, 
the Creative Dungeoneering Facebook page

As always, you can email us direct at creativedungeoneering@gmail.com.


Fold out Dice Tower Dungeon Tomb of Doom part 2

Wondering about shading at 4 am is terrible.
Wondering about accenting fake rocks at 4 am is just as bad. And wanting to finish a project more than sleep is even worse. But sometimes worth it!
Presenting
The Fold-out Dice Tower Dungeon Tomb of Doom!!! Final! Part 2!

So after a fitful few hours sleep I returned to the project to finish this up today. Or last night, er...early today.


I started with finishing the stonework for the outside top portion of the tomb, which was set over a small patch of pre-molded static grass. I opted to make these a bit lighter than I originally intended. Sometimes my 'world' seems pretty dark, and I wanted this to almost have a starker, whiter, high-mountain granite look in contrast to the green grass, so a bit of gray acrylic over the foam, followed by a black wash, and a dry-brush of lighter moonlight gray gave them a nice alpine look. 


I then moved onto highlighting the stonework on the outside lower portion of the tomb, along with designing the doorway, or appearance of a doorway when the lid is closed. I went with a simple stone looking black line, followed by a couple of "semi-glowing" blue runes, but I have mixed feelings about these in their final stage.                     

Moving to the inside, additional shading and stonework was done to the interior cavern walls, entrance for the dice drop, and on the crumbling cavern stairs. For the interior summoning circle I used the same blue lines, but the simple black scar of a circle looks a little less impressive than I was hoping for. 


This photo is pre-sealing, so the color will likely pop just a bit with a bit of gloss varnish over the runic letters, highlighting the "glowing ethereal power" summoning something from the dark cavern beyond. 

For the dice tower effect, I tested out the placement of the circle first, because I really wanted to create the effect that the dice were "appearing" in the summoning circle. 

I also looked into creating two different options for the rear "tunnel:" A portal complete with swirling magic, or a simple dark, black, cavern stretching off into the imagination.  In an attempt to always use space as wisely as possible, I opted to leave this as a black cavernous hole. It leaves infinite possibilities and can serve either as an addition to cavern terrain or some form of dark portal. Adding additional features to such a small space seemed to clutter it up a bit.            


Testing out the dice drop proved fantastic. WAY more than I expected! 
Apparently writing "MAY ALL YOUR DICE ROLLS BE ADVANTAGEOUS" in runes did the trick on the first officially completed "test roll:" Natural 20. 


Lastly, adding terrain and scenery additions to the top portion when the box is closed works as a great additional wilderness terrain or even as a simple start entrance to anything as mundane as a single tomb, or as deadly as...I dunno...this tomb.....