Forests End...

At the edge of the Valardale forest, spread thin along it's north-western borders lies the ruins of the
Caligh-Khazdule' Dwarven outpost, a once great expanse of stone and rock extending from the edges of the northern mountains to the edges of the Valardale, and the borderlands between the allied lands od the Elves and the Dwarven Kingdom of Caligh-Khazdule.'


The varied forest flora and thick undergorwth make for a twisting, tightly bound border that some say, is as enchanted as the very heart of the Valardale itself. More than one chronicler has recounted tales of Treant's, Wood Nymphs and protective Dryads along the forest's edge; guardians of the sacred and holy lands of the Valardale region beyond. Centuries it has been since a traveller has ventured along this thin border, for as all know, Dwarves and Elves are no fine friends. And it was along this narrow stretch of sparse border, that old prejudeces grew strong, and some say, still persist.
No Dwarves now rule Caligh-Khazdule', and few Elve's look west to this tortured outpost. Its very soil is a cursed and stony growth, bearing no fruit or flower where once the great stone towers stood watch. This land holds tales of greed, of wrongs not yet righted, and of old allegiences fallen, where tree doth not grow, and only rock can bare the presence of the dark brooding past that hangs over the region like a festering malignancy.

The most telling feature of the Valardale is it's sense of "watchfull emptiness," a pressence of hovering unease that one is always being watched by the hidden eyes of the Elves, although it is rare to see any stir within the thickly growing trees. This ever-present sense of foreboding keeps many away from the Valardale's sacred borders. But looking north and west, one may wish to stay close to those green borders for fear of what lies beyond the vale in the rocky regions of  Caligh-Khazdule.' It is along this border that the forest refuses to grow, encroaching only in small stunted trees along the rocky edges of this once magnificent outpost. 


In the distance, past rocky outcrops and distant fog lies the visible ruins of Caligh-Khazdule', only minor walls and tattered stone remain to face toe cold winds and unending silence. 

_________________________________________________________________________________

Putting together the last few posts that covered creating terrain, realistic trees, and developing story and plot lines based on minutre table-top scenery, comes a table top focused on utilizing all three: 

Wizards of the Coast Dungeons & Dragons Dunegeon tiles - Woods, Caves and Master Set used for base ground scenery, dungeon floors and cave terrain.

War Torn Worlds Greencast terrain for grassy hills, and Ruinopolis structures, ruined tower, and places of Mystery standing stones altar, stone spires and ruble piles.  

Hand-made trees (see previous post titled The wild wild woods...).

Put together on one game board tabletop, they make an impressive modular wilderness and dungeonscape suitable for D&D gaming, small scale wargaming or as in my case, simply great storylines and photos. 

The entire game board, pre-walls and before adding individual character miniatures.


Looking down onto the wood portion of the game board shows the location of the forest pool and the overgrown forest floor stretching nto the stone tiles of the Dwarven ruins. 
Wizards of the Coast Dungeons & Dragons Dungeon Tiles work great, but I prefer more three-dimensional terrain to go along with miniatures. The ammount of detail and artwork in the Dungeon Tiles is impressive, and work well for games on the go, but at home, they serve as excellent floor materials too. 


___________________________________________________________________________________

Somethign brews in the dwarven ruins of Caligh-Khazdule', something dark and eveil, long forgotten and left our of memory save for those tortured souls cursed enough to have witnessed it.
there are places on this world that are so full of evill, so open and direct a link to the realms of the ancient and dark powers, that the very mention of their name strikes fear and cursing into the ears of all who hear it. Caligh-Khazdule' is such a place.

It was not the Elves who drew the Dwarves out of their once mighty stone city. It was not the discomforting quiet of the Valardale, nor the tensions bewteen the races that left this great city in ruins, but it was the will and power of Orcus, Demon prince of the Dead, and the unearthing of his ancient temple far beneath Caligh-Khazdule' that was in the end, the doom for this great Dwarven outpost.

Soon, a foolhardy band with visions of wealth and adventure will set out seeking what they do not understand. They will carry weapons of war, and tools of their trade, seekign to challnege their wit and skill in the depths of the darkness, taking on the unnatural evil that fills this vale and the ruins it borders.
The foolhardy adventurer, how their lives are soon for not...


Lava & Mushrooms & Stalgmites...oh my! Part 3

So I began this project with the desire to match these new creations with the Greencast line of products I use regularly from War Torn Worlds  - one of my all tiem favorite miniature, role-playing and wargaming terrain and scenery manufacturers (www.wartornworlds.com). 
The real key to this was not so much recreating the actual quality and construction of the Greencast line itself, as this is amazingly well-made stuff, created from recycled tire rubber, but to create pieces with a similar finish as the other pieces I have in my collection, thus allowign everything to work as a modular system.

Mushroom stacks:
The Mushroom stacks in DAS clay turned out well, but a bit more rough (actually more real!) than their modeled after Wizards of the Coast Dungeons and Dragons counterpart. A greeen-white acrylic mix was added to the stained bases, and a mixed red and white was decorated accross the cap. Both will likely not see much game use, as I still prefer the D&D versions of these, but these will see some great use in the "fairy forests" of "Polly Pocket Land." For any one with daughters, you likely know what that is...

Stalgmite structures:


The stalagmites were simply brushed with a stiff-bristled paintbrush with an acryllic white to give a similar look to the War Torn worlds Rubble Piles that accompany my modular undergound/wilderness scenery set. Once the right "tone" of granite-looking white stone is achieved, they are sprayed with a LIGHT coating of matte sealant spray.
DAS clay tends to relaly saok up sealants, so be careful, otherwise matte sealant can turn a smooth DAS clay surface to glossy finish in no time if over-applied.


Lava Pool-Final touches:

In Part 2 I covered the staining and undercoating of the  created stalgmites, mushroom stacks and the lava pool. Like the other structures, the Lava pool was given a black wash with a grey over-tone to give it a natural stone look. Once the grey stone wash is applied, I brushed light white strokes accross the entire structure with a stiff bristled paintbrush. This was to match the "white granite" look of the modular War Torn Worlds terrain I was hoping to match. The entire structure was "stone washed" with the exception of the center inside base of the lava pool.

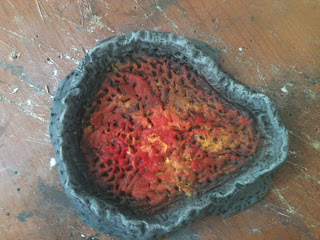
The center inside base of the lava pool was then covered with a light spackling of mixed reds, yellows and oranges. Brightly splattered in various patterns, and rather haphazardly applied with striking motions and random swirling strokes to drive the acrylic into the surface cracks and dimples along the bottom and inside edges of the pool.

I use older stiff or abused brushes for this to get random uneven textures and strokes. Cheap brushs for this natural finishing work fantastic. I think these brushes were $1.00 US from a nearby dollar discount store. They are fantastic for uneven, rough, and natural looking finishes. I am sure there are better brushes out there that cost as much as a new finished piece of terrain from Games Workshop, but so far, these work excellent.

To finish, I stained the entire piece (except the center inside base of the pool) in a matte spray stain, and allowed to dry. Once done, a light gloss spray is applied to the center pool area only. Don't worry if the gloss stain spaltters onto the inside of the rock walls, that actually will come into play later.


The next task was to apply the "lava."
I hesitate here to describe what I sued to create Lava, because it's the same "wonder" material that I have used to create award winning miniatures such as the Water Wierd, Gelatinous cube (both to be featured at a future time) and terrain water effects...but this blog is 99% solely for my own creative expression and has very few (if any) readers, therefore, I doubt I am loosing much by giving away any form of "secret recipe" here. The magic ingredient that amkes for some of the most wonderful, long lasting, easy to obtain and cost effective structures and creatures is.....

plain, old, hot glue... 
Yup. Craft store quality clear hot glue sticks. Nothing special, nothing fancy, nothing expensive. To emphasize again here, sign up for Hobby Lobby email newsletters and get 40% off coupons weekly. I believe Michaels and Joan Fabrics do similar promotions. 

I applied the hot glue in pooling, streaming motions, layer over layer to give the lava depth and swirling patterns. Let it cool and allow it to sit thin enough to have the previously painted "lava colored" sub surface of the pool show through, hence the light orange and red color beneath. 

 Notice the light orange and red hues shining through the laid hot glue. bubbles in teh hot glue as it forms only add to the sense of "bubling magma" and they can make for great additions ocne/if paint is applied. 
If the hot glue is appled thin enough, no coloring is needed, but I really wanted this pool to "glow" so I applied a layer of "lava" paint over the top of the completely dried and hardened hot glue surface, now a smooth plasticy finish. 


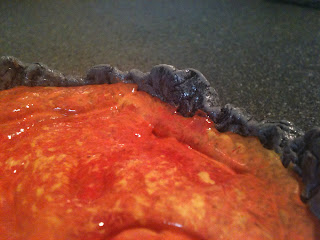
When the glue si sufficiently dry, paint is applied in much the same way as the surface of the pool bottom was before laying the hot glue - rough, uneven stabs, strokes, splatters and pools of mixing colors. Let dry, and stain the final while it is still lightly moist, with a gloss spray. the gloss spray will shien ovber the inside upper edges of the rock lip, which is a good thing! This will give a "false glow" to the lava, tricking the eye into making it look like the colorful lava is "glowing" (or in this case, "glossing") against the drab, dark-washed stone edges of the pool.


Notice the glossy sheen to the inside edges of the stone. Some of the fine edge painting was doen with a much smaller brish to get the mixed acrylic yellows, reds, and oranges into those small cracks and crevices. 

  
And here is our stalgmite pieces and lava pool in relation to the other modular War Torn Worlds Greencast pieces, all finished in grey granite stone:


Notice how the final finish of all piueces is so close that intil each piece is touched and felt, they look as if they came from the exact same set. This makes it easy to sue as many or as few pieces from this same terrain setting as needed for each individual wargame or module setting. 

All in all a successfull little project that will make a great backdrop for the Deathpriest of Orcus and his two cultists to call forth the Aspect of Orcus from the coming portal, the inhabited corpse sacrifice, and the heroes lurking in the shadows to thwart the evil plot...


Lava & Mushrooms & Stalgmites...oh my! Part 2

Continuing the tutorial here on creating some unique scenery, the second stage of this project involves  the staining and initial colorization of the structures, or in this case, natural terrain.
I went with a stone-grey wash, made from a watered-down black paint and water. this does two things:

1-It allows the paint to take on a grey look, more "stone' like than a standard mat grey or black.
2-the watered down recipe allows the paint to seep into the cracks and crevices of the DAS claymore naturally, giving the look of divots and pock marks, rock holes and cracks in the natural shape and structure of the terrain.


I started by laying a flat grey paint all over the entire piece, filling every hole and crack with the same thin layer of standard grey acrylic paint.
I paint over a slab of marble. It's smooth and glossy, and allows me to use it as a palette well, mixing colors with the right amount of water and then easily brush off the excess for a clean surface later. a Metal sheet works well for this too.

Not a lot to see at this stage, but the flat grey tone throughout laid by brush, seemed to really get into the cracks better than a typical spray primer. The spray primers often can gloss over the subtle surface textures too much, filling holes with globs of sprayed paint and eliminating the small details that the DAS clay really brings out, especially with natural terrain, like rocks and cavern structures. Also, I wanted my cavern structures to mimic the terrain creations of War Torn Worlds Greencast line - (http://www.wartornworldsstore.com/) a line of products the guys over at WTW make from recycled tire rubber adn that looks and LASTS forever!!! It tends to have a white finish to the natural grey stone as seen in the image here, and thus, I needed the grey-black base to brush the white finish over the top of in the final stages, coming soon.


(Picture by War torn Worlds-Rugged Spire A)


Having two of these rugged spires, I love how they can work for outdoor natural mountainous terrain or underdark or cavern type spires. My goal here is to try and make modular pieces of cavern stalagmites that match this same finish. Notice the heavy white-gray brushing over the dark gray-black of the undercoated recycled rubber.


A note on the clay here too. this is great stuff for several different things, but as good as it is, I have yet to really nail man-made structures - buildings and bridges that I have designed in the past simply came out looking too "worn" or "dilapidated" with the DAS clay, and so natural terrain, caves especially, seems to be where this material really excels.

Mushrooms
My original mushroom aim was to create a similar mushroom stack to the D&D Miniature, the Deathcap Mushroom, but in smaller stacks of two, to allow them to be used alongside the standard D&D Minis and give a natural cave growth look.
I started with just the base on these. Again with a watery-grey primed mix of acrylic and water, set into the stocks and underside of the mushroom caps to allow the paint to seep deeply. these DID NOT get the flat grey undercoat, however, and here is why:
On the D&D version I am mocking these up to look like, the plastic of the miniature actually shows through a bit, giving the undertone of the stalk a whit-ish look, lighter than a grey or primer base would allow. Because the DAS clay works so well at absorbing paint, and dries white, it makes a perfect base to match the "light grey" of the D&D Deathcap mini. Once this dries, it will get brushed with the right color, and will actually be a somewhat faster process than the cavern terrain above.


Next stage: Painting and color and Lava accents...oh my......

The wild wild woods...

Few things capture the imagination of fantasy and adventuring than a good forest.
Every good adventure movie has one. I've always dreamed of developing some form of "Adventure Film Festival" NOT consisting of "hippy-esque" "look at me I climbed this peak" or "skied this slope" type movies, but of REAL adventure movies, classic, adventure and fantasy adventure at that, films and cinema. Cheezy graphics, hokey special effects, and mediocre acting and dialogue a given, but what they would all have in common is one thing...travel.
And that "travel" almost ALWAYS involves journeying through a forest.
Examples? The Fellowship of the Ring, the Hobbit, Legend, Krull, The Magic Sword, Clash of the Titans, Sleeping Beauty, Dragonslayer, Conan the Barbarian, Sir Gawain & the Green Knight...the list goes on and on.....

So a forest is an integral part of any fantasy adventuring landscape. The problem is that for tabletop role-playing you have about three choices when it comes to forests, maybe four:

1 - Buy pre-made trees that look like they were borrowed from Dickens's Christmas village miniature decorations. what you get is almost always bright green pipe-cleaner pines on small wooden bases with a sprinkling of crappy looking snow. they flake, they look fake, and they are in a perpetual state of winter (which depending on your campaign or imagined world, may or may not be a bad thing...Narnia comes to mind...)

2 -   Buy nicely made pre-made trees from, say Citadel Miniatures. Citadel Wood is a favorite of mine.
http://www.games-workshop.com/gws/catalog/productDetail.jsp?prodId=prod1095512
They look fantastic, require a bit of work, can be sued with or without foliage, giving them a "dead swamp" look, but they cost a small fortune too. $30 for three trees...$10 a tree? For three? three trees a forest doesn't make. Sorry. And at $10 a tree, I could practically afford REAL trees...not to mention the time it takes to construct the final product. I still want these, and eventually will have them. Illogical as they might be compared to the ones I will be describing here.

3-Go with "non-tree forests" using "something" to represent trees....I guess this works. But this is pretty much the same as option 3A here too: go with 2D trees, as in Wizards of the Coast Dungeons and Dragons Game tiles:
http://www.wizards.com/DnD/Product.aspx?x=dnd/products/dndacc/9780786952465
Now to be fair, and because of my  undying loyalty to anything made by Dungeons & Dragons and Wizards of the Coast, I love these. they make magnificent ground tiles over which to put REALISTIC trees...but using these as the forest itself is fine for the non-miniature focused gamer or the lazy DM.
But this brings us to option 4....

4 - Make a REAL forest yourself with a bit of time, a bit of glue, some patience,and whole lot less money. And here's how....


Glue type:
I DO NOT recommend spray glue. This is what Scenic Woodlands suggests on the back of the package, but I have never had much luck getting their clump foliage to work real well with spray glue. It just is not sticky enough. Toughen up your finger tips, because HOT GLUE is your best friend. For this, as well as MOST other RPG and War gaming scenery projects. It is tough, mold-able, shape-able, and dries fast and hard. Everything with the trees is done with hot glue. Yes, it burns when your fingers touch it, but only for a second. for amazing water features, see using hot glue mixed with other concotions for those too. It is an amazing and completely undervalued modeling material. 

Foliage & "Leaves.
"Start with a pack of Scenic Woodlands (or similar brand) woodland railroad train scenery, foliage or clump foliage. I prefer anything that says, is sold as, or marketed for "railroad scenery." 
The reason being that, for whatever purpose, this stuff is INFINITELY cheaper than if the same item is sold in gaming hobby stores or marketed for role-playing or table top war gamming. I don't know whether it is because "railroaders" tend to be more price conscious, stingy or just plain "geriatric" and refuse to pay "Citadel-esque" prices or what, but the stuff is EXACTLY the same, often the same brand, and cheaper when designed and marketed for train modeling rather than gaming. 
Go online, sign up for a few emails from Michaels, Roberts Crafts, Hobby Lobby, Joanns, etc.....get a  40% off coupon, go get it there. Save a bundle. 

Tree Trunks:
Got a yard? Live near a park? have a neighbor with weeds? Get your tree trunks there. Seriously. DO NOT fork over the money for a bag of sticks labeled "realistic tree trunks" from Woodland Scenics. They sell bags of sticks, all "fairly" straight and usually hanging right next to the clump foliage, for a ridiculous amount of money. THEY'RE STICKS?!!! Seriously? $12, for sticks? 
Just go get them from your own backyard, or the park, or your neighbors....if you have no access to sticks, you likely aren't looking real hard, or live in the Mojave, Gobi, or Sahara Deserts, in which case this is likely not a real applicable blog post for you anyways. Hold off reading until I get into "Creating Desert Terrain" next month. 
Weeds, sticks, scrap wood from the wood pile, shave, scrape, carve with a knife into "fairly" straight (or not depending on the look you want) pieces. Walla. Tree trunks. The more spines and sticky little points the better to grab that foliage, but more on that here in a second. So weeds or the tips of overgrowing shrubbery work great. Strip off old leaves, real bugs, etc of course.

Bases:
Foam core. Fantastic. Poke a hole, stick in your tree trunk, glue (see gluing tips below). Let the glue overflow the hole and the trunk a bit and don't worry too much on this yet. We'll cover it up with rocks and underbrush here soon. Scrap foam core, Styrofoam, card stock, even cardboard will work well. Just make sure the diameter of the base is wide enough to aaccommodate the size of the tree you are hoping to create. Notice in the photos here the bases all have real rocks. these are for balance, weight, and to cover up the unsightly holes where the trunks are drilled into the bases pre-foliage. they look fantastic when done though too.  


Foliage and Leaves and gluing:
Apply hot glue to the stick, top, letting drip down, cover trunk and branches well, let it drip and web and pool and stick all over like a spider-web like mess. Grab a hunk of foliage, apply, and pull.
Pull gently, but pull, the remainder off. Keep pulling and re-applying to new, uncovered spots. When you have that section covered to the desired fill, apply more glue on top of the first layer of foliage, and re-apply more foliage on top. Keep stacking foliage on top of hot-glued foliage, until you have both the shape, dimension and "bulk" of foliage for each tree. 
Once your each a good stopping point, apply foliage and rocks (available from dollar stores or even grocery stores for cheap, small pottery and vase size pebbles work best) to the base. this will not only re-enforce the trunk itself and the weight of the tree, but give the base a well covered "natural" look. 

Finishing:
When your done, you will likely NOT have the exact shape of the tree you set out to make. The glue tends to react to the foliage and the individual shape of each branch and stick or "trunk" to create random patterns, and applying the foliage to this only heightens the sense of "natural randomness" as well. Thus each tree is completely unique and looks totally different from the next. 

This is what makes these so good! They are ALL unique, each is different. Different shapes, sizes, bends, curves, structure and general look. Not only will your tabletop role playing or war game forest have real elements like rocks and wooden trunks, but you will have the look of a real growing forest as well, with each tree different. Add in different colors and forms of foliage each time you do a set of trees, and the forest will grow and develop into one of the most beautiful pieces in your collection. 


Lava & Mushrooms & Stalgmites...oh my! Part 1


In an effort to really keep the number of dungeon and table-top role-playing accessories and terrain pieces I have to a minimum, I have, as mentioned in my last post, gone pretty much to collecting and creating story lines, module and dungeon plot lines, and detailed-miniature scape's with pre-made, pre painted, and pre-fabricated pieces. 
I suppose that once I again, amass a collection of hand made items, I will likely, after much documenting and posting here, sell these off as well. Who knows, maybe there is a market for these, other than the plethora of sellers already producing crappy hand-made items via their "eBay store."
I personally, want my pieces looking as realistic as humanly possible. I have been shocked and disgusted with some of the crap other gamers turn out for use as table-top terrain. Why have it at all if it doesn't look absolutely fantastic. 
"Your supposed to sue your imagination" one might claim-true-but then why have table top miniatures at all? 
But I feel the same way about my gaming space too. I was not satisfied playing at a "kitchen table" so I built an entire room into my home complete with hard wood floors, floor to ceiling shelves, fireplace, leather chairs, flags, statues, bones, spell items, old tomes, and artifacts from all over the globe...a proper English study that looks as though it came from a turn-of-the century English mansion. 
Still hunting down pictures but I'll get into Dungeoneering interior design space soon enough...

Onto the newest design project!
Lava Pit:
I have recently acquired a couple Dungeons & Dragons collectible miniatures for Cultists of Orcus, and a Death priest of Orcus (who, by the way, looks suspiciously similar in it's horned headdress to the priest of Kali from Indiana Jones and the Temple of Doom...may have to use this mini to do a future post on modifications to D&D Minis...). With a D&D Collectible Aspect of Orcus miniature on it's way, I of course, must have a bubbling pit of Lava from which to call forth the Aspect! Throw in the poor slave-sacrifices and walla...you can create a generally macabre scene of evil for a magnificent Demon Prince like Orcus!

First.....
These projects are all formed from DAS clay, air hardening modeling clay. Available for various prices in various size packages from local hobby stores. 

Tips on creation:
  • Don't try to use their tin foil packaging to keep the air out once you've cut it open. Stick the whole thing in a big zip lock bag to keep the exposed unused clay from hardening when not in use. It's pricey enough to not want to waste anything you don't have to. 
  • Pull a chunk out, re-create those Play-Do molding day's of yore (minus the eating of course if you were into that...) and make sure you use in a well-ventilated area. This stuff can stink up a room with the toxic aroma of chemical exuberance in no time. 
  • find a tool or two you can use to aid in molding and texturizing, but be cautious to only use ones that you can devote to this. The powder coating in the DAS clay doesn't really come off, and will pretty much kill the tool for anything other than menial dirty use. 
  • Wash hands thoroughly when done. You ll notice a fine white film coating your hands after molding, strong smelling...bad tasting. 


Lava Pool: 
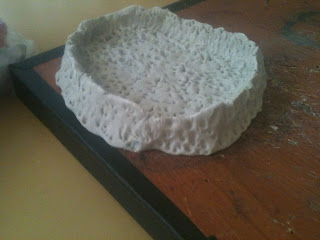
Started with a basic flat section of clay, molding up into rocky, uneven sides, and then sued my tool ( a vintage walnut cracking pick from a local second hand shop) to poke, prod, and roll the surface of the tool into the moist clay to give the base a pock-marked lava look. I also used the rounded end of the small metal pick to distribute the clay in uneven "flows" along the edges, giving the look of a crater. 


Stalagmite mound:
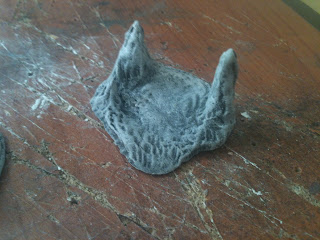
Molded spires into thick sloping groups around a central base of fairly flat clay. Used the rounded walnut pick (seen in right corner) to sculpt the sides of the stalagmites in a downward motion, giving the hardening clay the look of old flow stone or dripping and drooping rock from minerals dripping from some ceiling above, pooling into soft pouring slopes of rock below. I wanted enough surface area in the middle of the stalagmites to be able to not only place 1 to 2 miniatures for game play, but also to provide a potential passage, tunnel, walkway, trap, dead end "look" or even cover should the stalagmites need to serve as blocking during an in-game ambush or cavern battle. 


Mushroom stacks:
Having just acquired some Dungeons & Dragons Miniature Deathcap Mushrooms from Strikezone Games (http://shop.strikezoneonline.com/Category/Games.html), and they were a fantastic price and arrived REALLY fast by the way, great plug for these guys...

I wanted to try my hand at adding a few in double stacks to match. These will likely be painted to match, and if I come up short, they'll be modified to  be a different species likely via paint and coloring effects. 
These were tricky, because DAS clay doesn't really stick to itself as separate pieces that well when they start to dry with little or no pressure between layers. thus, I found that forming the stack and the cap separate, and suing a tiny dab of super-glue between the two layers did the trick. Otherwise, I was having to smash the mushroom cap down to adhere it to the clay of the stack, and as a result, the mushroom stem became "squat" rather than firm and slender as on the D&D mini version. 
These will be added to a black rounded base to mimic the look of the D&D official Deathcap mini as well, as I'd like ti sue them in conjunction with the original versions to create a subterranean mushroom forest for future cave scenarios. 
Textured the stems and tops with same tool, rounded edge of base of tool, sloping stem accents with the sharp end to give a "growing" and natural look. 


Next stage: Painting and bringing to life, texturizing, and adding lava effects. 

Keeping the Gateway Open....


The Gateway is still open...even after a CLEANSING!

Recently I sold off everything I have developed over the years for this blog. There is nobody really Reading this anyways, so I can pretty much describe this in as few of details as I would like since no one really knows what I am talking about, but there it is....
So I started creating dungeon and table-top role playing terrain as a fun creative way to develop some very detailed scenery to pull in two nephews who I began playing Dungeons & Dragons with a while back. Trees, real rocks, waterfalls, fountains, mountains, deserts, caves, lava, sewers...entire city's, everything......
It became fun to try and re-create miniature sized worlds, photograph, write story lines and plot lines, and give details on how these could be created for less than the price of purchasing these via Dwarven Forge, war Torn Worlds, Citadel Miniatures, etc.
Then I realized something.......
I LOVED these company's! War Torn Worlds especially! (http://www.wartornworldsstore.com/). I wanted to support them, devote more time to writing, story telling, and enjoying the collecting of the miniatures and hobby, and only create a few here and there. 
This, plus I was REALLY running out of space! I had filled two large steamer trunks, and entire room, and built on an entire room in my home just to accommodate gaming supplies. 

These were now, due to the growing lack of interest of the two primary people I played RPG's with, going completely un-used, and as a result, un-appreciated.

We all grow up, we forget that things we loved and believed in were almost real once. We forget that being involved in things many see as "immature" or "geeky" can sometimes keep us grounded, innocent, and help us remember that life does not always need to be so heavy, but can be filled with creativity, fun and excitement, no matter the age. Unfortunately, my nephews are growing older, and so am I, and RPG's and D&D is more of a hidden personal hobby and collection, for the sheer enjoyment of it than the actual playing of it, if that makes sense.
As a result, it was time to clean house. 

I sold everything. 
Well....almost. The world, and the stories it generates that exists in that old fashioned dungeon-esque castle library in my basement still exists....my gateway still remains open to that creative world, that realm that I grew up in, that doorway to that realm of imagination, fantasy and magic. 
A few key items were kept, and a few are still being collected. 
Mainly now consisting ONLY of:

-Official Wizards of the Coast Dungeons & Dragons collectible miniatures. i think I might have a serious condition, because these, I absolutely love. Re-painting and customizing, or just keeping the way they are. I love them. Great work guys. Keep it up, and forget that stupid Heroscape crap. Please. OK, it isn't crap, it's just not as nice as the D&D branded stuff, even though a lot of them are the same mini's I know....

-War Torn Worlds brand scenery, Greencast rubberized recycled terrain. This stuff is AMAZING! Bombproof, stack able, store able, and absolutely lifelike....plus their customer service, communication and pricing is second-to-none. And the fact that they are from Sacramento (my home town) doesn't hurt too bad either....
-Citadel miniatures, Lord of Rings collection only.

Stories, sub-plots, and tutorials for limited pieces will continue here. And maybe someone will stumble upon this blog somehow and get some inspiration or ideas for keeping their own gateway open.

Coming up next....

Lava pools, homemade mushroom stacks, and some great little Stalagmites....