Paladins, Mounds and Elephants...oh my! Part II

What good are projects of miniatures and fantasy characters without epic terrain and backgrounds to go with them? At the very least, a backdrop of old stone, forest pines, or stone mounds adds a sense of wonder and imagination to a simple image of a figure so painstakingly cared for and detailed.

For the continuation of my Paladin, Shambling mound, and War Elephant project, I tried to outfit and present them in an environment I thought they may actually find themselves in during any given tabletop game...

Paladin of the White Flame

For the Paladin, I added a bit of "distress" to his features not really captured by the camera. I wanted this cloak to look like it was "used" and not just court wear for the halls of old Greyhawk. Tattered spots, tares, and even holes are visible on the underside. Slight bits of fresh blood dripping down the magical rune script of the sword, and even wear and tare on boots and armor. Having looked at this closer, it seems it could use some additional depth, though, especially on the cape and backside. Nothing a bit of black wash can't "bring out" to add life to his adventure-torn appearance.


As detailed as the base is from Reaper miniatures, the texture would likely be best in a solid black. While this paladin's green base works well for outdoor encounters, I always prefer something neutral that does not take the character and your imagination out of the game if possible, and every time he sets foot into a stone dungeon, the green of his woodsy looking base seems out of place. 


Shambling Mound

The Shambling Mound was designed to look so much like a natural form, that unless the peering green eyes were seen, one would easily mistake it for a bit of brush or a rotting bush of some sorts. I always pictured a Shambling mound coming from the magical undergrowth of rotting leaves and dying vegetation, with its only life being the eyes itself. So its general appearance fitting into a woodland scenery was first and foremost. 


It is not until the small subtle slits of glistening green are seen, that it becomes apparent that this tangled mass is  a living moving thing. 


For size comparison, next to a Halfling, I wanted the creature to tower over, but not be so large and great that it would appear as an insurmountable foe. A small woodland encounter mysterious and nostalgic enough for a small raiding party was the goal with this custom-made creation. 
Sadly the photos do not do this creature justice, as he took Best in Show at the 2010 Conduit Miniature competition. 


Orc War Elephant

There are a series of thrift stores here in the state of Utah called Deseret Industries. Within these stores of used clothing, and just about every random item and outdated VHS tape one could ask for, lie often times isles and isles of completely scattered, mis-matched and discarded, but perfectly adaptable, toys. It is from these disheveled and rarely organized racks that I find some of the greatest creations. Such was the case with this Orc War Elephant.  


This poor fellow was missing one tusk, broken at the tip. But having just finished a Lord of the Rings movie marathon, the idea of the angry Oliphiant was fresh on my mind. Nearby his discarded glossy grey frame lie a battered toy of some sort with a long spoked flail. Together, they made for an odd and yet completely believable duo of Orc madness. 


Filing down the end of the already broken tusk, I adhered the flail to its single tip and added the brushed elements of previous victories in the form of small bits of torn tissue and stained blood. Arguably, the hardest part of adapting this creature to becoming the War Beast he is was re-painting both the eyes and the skin. 
he eyes were difficult because they simply looked too "happy." While I have a deep love and respect for all animals (most times more than I do people), I did not want this particular Elephant to look at all "pleased" with his current state. A solid black eye, with just a touch of small iris in opaque white and a gloss finish over its sweating, or crying base, added a sense of regret and angered vengeance to his appearance. 
Second only to making the eyes look "fiercer" was creating the sense of wetness or sweating from the workload, the abuse, and driving force of battle. The catch was creating this finish onto a simple rubberized-plastic surface without it looking too shiny...tough. Especially on the ears, visible here. All in all, not too bad, but there is room for improvement in future beasts of war I believe. 

From below the War Elephant presents and imposing force, allowing the Orc raiders to balance some 6-8 soldiers or more on top of the War Elephant's broad shoulders.


The sides of the war platform are lined with bones and two flickering torches. The bones are disassembled parts of a skeleton decorations from dollar-store Halloween parts. Torches are made from a rolled bit of brown paper over a simple paper clip, adhered together, and then painted black. The flame is simple hit glue left to dry in layers and molded while warm to create a flowing "fire" look. Gloss finish is added to the flame tips of both torches to give the look of flickering light, while small bits of basic brown hemp string were used to line the sides of the platform and "strap" the bones from some previous giant beast or victim onto the platform walls.


From behind a giant's skull adorns the far of the rack and the banner mount, bordered by two foul vats of boiling oil and flaming fire. Perfect for the Orc raiders to dip arrows in before launching at foes running in terror from the swinging ball of death at the front. The small barrels are simple wooden dowel shaped drawer pulls, turned upside down and painted as black cauldrons. Total cost for a bag of 12 at the local big box hobby store was I believe, somewhere in the range of only $2.00. 


Another area that was tricky was creating the sense of "structure" to the War Elephant. 
The platform was made from simple balsa wood with a round wooden front, almost like a jumping platform for dismounting orcs. Two leather straps were fixed from under the platform and around the mid-section of the beast, and cuts, scrapes, wear and skin abrasions were added to give the look of cruel and unusual punishment and abuse of their mount. I don't imagine Orcs being the most beloved of animal handlers. I also wanted visible signs of war damage from areas where mounted enemies could reach with arrows and spears. 


Th dreaded Orcs of the Black Eye War Elephant is a ferocious sight for any tabletop role-playing adventure group, and took first place in the 2010 conduit Convention large modified-miniature creation category. 
To this day, however, this poor beast lacks a name....Suggestions are welcome and appreciated. 
What is a worthy name for such a massive Orc war beast?


* Next, updates on award winning miniatures of a Gelatinous Cube, a Water Weird, and...a bit of human skin....sort of....

Paladins, Mounds and Elephants...oh my!

Strange things are brewing in the depths of the Ursus Templari dungeon. New commissions, new photos, and some much needed photography, modeling and painting updates for previously done work are nearing completion.
It seems a shame to go to such painstaking work on such beautiful images of the imagination, and then slop together photography void of background scenery or color. So to truly capture the essence of custom ordered commissions, individually thought out projects and creatures of wonder and imagination, I of course, must create terrain to go with them...More on that and final images in Part II...But for now, the project list consists of...
  • Paladin of the White Flame
  • 28 mm small scale Gelatinous cube 
  • A woodland Shambling Mound
  • Orcs of the Black Eye War Elephant
  • A replica of Reaper's Well of Doom...


Paladin of the White Flame
This is a Reaper Miniatures Evil Knight, but it is being designed to be used as a Paladin character. It has not only a great set of armor, but a good non-combative pose as well. The pose seems almost in surprise, or 'hold' of sorts, as if just beginning the movement into an action or encounter. I love that small but subtle feature, as it adds a sense of realism and "humanness" to it despite the full-face helmet. 
For those lovers of Sword and Sorcery films of the early 80's too, this helmet seems somewhat modeled after that of the Jun Horde from Beastmaster, but in potential "Holy Crusader" format. 


The White flame is an in-game Order of Holy Paladins with a special emphasis on combat against certain forms of evil, each Paladin choosing their specific foe or enemy specialization. This will be an interesting challenge to incorporate into the figures finished painting. 

For the Gelatinous Cube,  a smaller, more manageable version was needed. Previously I posted about the massive greater Gelatinous cube I created, and while it had the requisite amount of "dripping ooze" I wanted to create a version for this commission that was somewhat smaller, less grandiose, and yet still retained some of the characteristics of half-swallowing an unfortunate Dungeoneer. 
Adequate scenery for such a hideous creation must be organized before proper display can be presented. 

Shambling Mound

For the Woodland Shambling Mound, I wanted to create a REAL Shambling Mound. Not just a swampy version, aka Dungeons & Dragons mid-80's cartoon or LJN Plastic figurine:


Starting with a wire armature and a bit of hot glue, I added mossy and grassy elements and bits of small sticks into his tangled mass. A head and face of some twisted wood-form seems appropriate for this strange magical creature. More on this later...


Orcs of the Black Eye War Elephant
A classic war Elephant from a pre-existing model, but with all the accouterments of war, including bridge, rope, straps, flags, and of course...FIRE! And what would a war elephant be without an Orc horde hanging from its war-torn hide and charging into battle? 


Well of Doom
A bit of cardboard, some floral foam, hot epoxy resin, and a hand-carved mold, and we may just have the next incarnation of Cuthulu or at the very least, a mini Sarlac....Or we could find this is a botched attempt to make a creature I simply do not need, nor have the space to store...


More to come......

Two spiders and a Paladin....

"Do you ever do Custom work?"

Yes.
I've been asked this a lot lately.
Cost? $0.00. Nada. Zip. Zilch...sort of...

So I LOVE painting miniatures. I started with a Ral Partha Paladin back in the early 1980's, and have been painting constantly, and for some period, professionally (I guess, in terms of steady re-imbursement for such work) at my local Hobby Store near Orangevale California...)
I relish the personalization that this small token of ourselves in this magical world reperesents.
The customization, description, story, history, myth, personality...all those features come to life when paint meets brush and is applied to figures and objects in the tabletop world. But in an effort to capture my love for this hobby...I only work on the barter system...Trade.
For miniatures, custom modeling work, painting, terrain...anything. The bigger the project, the better the trade should be that is offered. Now realistically, we live in a  world of dollars and cents. But this is not a hobby that needs to follow those same parameters.

Here is a fantastic example:
Two spiders and a Paladin....
A good friend of mine asked if I would be interested in doing some custom work.
I took on two Grenadier Giant spiders and a female Paladin. Now while my photos from the time are not presented here as well as I wish they were, what I loved about this project was the story and suggestions behind them.

He asked for two Demonic spiders of Lolth, but wanted some slight variation for use in both woodland and under dark environments.
This immediately brought to my mind the coloring, pattern, texture, and finish of each spider. So it's the research and imagination that goes into a project that truly captures my fascination.
For the Woodland spider I opted for a textured brownish finish with a nice fluorescent green for eye accents and to give the fangs the essence of "dripping poison" while the Underdark arachnid received a more traditional black and purple finish.
Both were completed with symbols of Lolth on the abdomen and hind quarters, but in different shades, that while evil and creepy, also gave them a more believable natural look.
Off white or cream for the Woodland, and traditional red for the Underdark.
The thought is what made it such an enjoyable project.

Seen here in a natural terrain setting with a Drow handler (Wizards of the Coast Drow magic user mini), both the woodland and the Underdark spider seem right at home on the table. Being a fan of elaborately designed tables, a woodland battle was one of my favorites for these two pieces.
For the female Paladin (which was for this friends spouse) he wanted a more traditional Paladin of Bahamut motif. This allowed me the ability to really research not only the coloring and elements of style for the worshipers of the great dragon, but to follow the coloring and features of the individual this was for as well. 
From brunette hair, to the blue and white cloak of the Paladin order, the white leather grip matching that of her overlook and even the trim on her shield. 
Last but not least (and hardly visible in this overhead shot here) was the leg armor, adorned with just a small splash of light brown. This was no courtly Paladin, but a true adventuring Paladin, not afraid to get her feet a bit muddy. 


As payment for this work, I was blessed beyond measure with not only a fantastic DM, but also a full size two-handed crusader broadsword. Speechless....
I am not worthy of such payment, albeit I was happy to accept it as such. But it was the respect and relationship, the delving into something so personal for a fellow gamer that truly was my payment. Thank you for letting me step into what might be your imagination, and inject just a bit of my own, ...if for only a few hours.

ON BASES:
I am not a fan of textured bases. While some miniatures such as Reaper uses a textured base that can either be stone or grass, I often prefer the basic black of the standard Wizards of the Coast, Gale Force 9, or even WizKids bases due to the "negativity" of the color value. 
Why such attention to detail? Why so much over-thought? Because some of us play table top role-playing games just to enjoy immersion in another world for a few hours. And some of us RELISH that immersion to the point of it being an ever-present goal to increase the sense of imagination and wonder surrounding every available element of the gaming experience. Terrain, lighting, music, speech, dress, even food and beverage. 

Someday I will hopefully find a gaming group that shares this passion for terrain, scenery, attention to detail, and even costuming...I'm happy to roll dice in chain mail and gauntlets, even if it does drastically affect my penmanship... 

More examples will be posted as soon as time allows, but for any inquiries about custom work, creation, terrain, or even fabricated miniatures, email Cavalier Elrik at creativedungeoneering@gmail.com.
I am afraid Facebook refuses to acknowledge me as a real person, therefore, there is no page as of yet....alas, I am of flesh and blood, and located in Herriman Utah. 


Gelatinous Cube on less than a buck...

I love the infamous Gelatinous Cube.


I hate Jell-O, but I do love the weirdness of it's magical creation deep inside a dungeon cell or hall...
I've never been able to find an actual licensed Wizards of the Coast version for an even mildly ludicrous price, and I've not been overly excited about the versions I've seen available from other crafty geek types; too opaque, too cartoony, too pink (yes....pink) or just plain cheesy. Plus, I love the possibility of an "interior space" for those moments when/if a player character has the misfortune of seeing the inside...

I've won awards for gelatinous cubes before. I made one of my first out of a small rectangular clear box left from a bicycle tire repair kit, covered in epoxy and with the added feature of a half-exposed dissolving corpse (thank you Heroscape figures...great for parts but hated your huge bases). It won First Place at the 2010 Conduit Convention in Salt Lake City. I was surprised to say the least that there was anyone anywhere that appreciated this sort of "geek craft."

The one aspect of it I did not love, was that it always felt a bit small to me. I wanted players (someday) to encounter a REALLY BAD gelatinous cube, like a full passage blocking monstrosity Gary Gygax coukd be proud of. 

This one might be close. 


BUT...I wanted the challenge of seeing if I could make this on a whim with what I had just laying around, and on the cheap. Mission accomplished...total cost about $.50 give or take a bit...


I started with a clear plastic badge holder from (ironically) a past convention...the hard plastic badge holder stuff. Once I cut this out into a foldable square and bet the edges to hold their shape, I covered the whole thing in packing tape. Plain old clear packing tape. 

Once the packing tape was sealed, creating, essentially, a clear square, I simply cut through the bottom side with a hobby knife, leaving one side open.

This was then covered slowly in layer upon layer of hot glue. the real key her is the layers. too much too soon and it all blends together giving too much clarity and possibly melting your packing tape and plastic shell. Layers add depth, dimension, a sense of "movement" and "life" to this gelatinous mass, but also increase the "opaqueness" of the clear snot-like goop, and frankly just looks down right creepy...

Lastly, I applied a thin wash of lime green acrylic to the inside. This allowed a slight green glow to shine through from the inside, giving the cube just a  touch of color.


And the final version, well fed on a curious dungeoneer...his now slowly dissolving corpse just barely visible beneath the layers. 
A perfect resemblance of the infamous oddity that is...the Gelatinous Cube...


Smaug's Horde-FOUND!

So I found the solution to creating the "flowing gold coins" look I was going for with my Smaug's Horde project: 


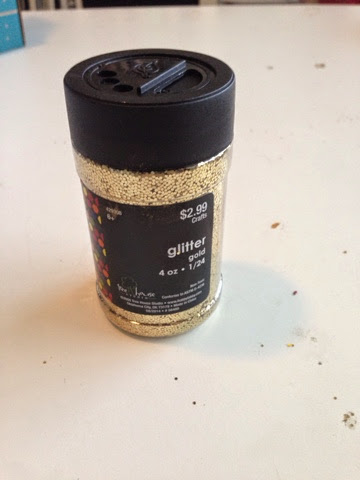
Plain old gold glitter. 
Yes. 
Gold glitter. 

$2.99 at my local Hobby Lobby and in the perfect small coin size. My project room looks like a 70's euro disco, but nothing a bit of vacuuming can't fix. 

Once applying the glitter over the painted pile, the form really began to take shape. 


I added small jewels, gems, crystals and even random bits of metal to the horde to really give the look of ancient unidentifiable artifacts buried in the horde. These were removed, cut, pulled and pried from old costume jewelry and by pilfering through my 10 year old daughters collection of beads (sorry sweety! RPG emergency!!!) 
A small painted cauldron ( wooden bag of 10 for $1.99 at Hobby Lobby) spilling out gold coins added a touch of realism along with an earring back which served as a perfect sized 28mm round shield, half-buried in gold coins. 
Beads turned to hide center holes make perfect orbs, globes, or even 'Palantir's' along with the presence of diamonds, massive ruby's and various trinkets. 
Lastly, I sealed the entire pile in a gloss varnish spray (spray helped keep the glitter in place for brush on varnish) and spot gloss with fast drying polyurethane. 
Not too shabby for a total cost of probably $8! 

Ideas & Inspiration

It's amazing what you can find that inspires some game ideas and inspiration. Occasionally on this blog I'll throw out some random images I find around this strange campaign-world I am currently in...where I play a level 13 International Creative Director for a major health and nutrition company that maintains a love of fantasy role-playing games and artistic terrain and world building...
Good grief that sounds boring, how did I roll that class?


Found this online the other day. An 80's tutorial on creating your own Hoth base out of foam packing material. Good for my parents that I never saw this back then or I am sure the house would have been a "winter wonderland" of cut foam and random packing peanuts. 
This probably explains the interest in creating my own terrain. The ironic part is having grown up in the 80's playing with just about every pre-fabed Kenner playset the Star Wars brand had to offer, I still ended up creating my own and sticking with the D&D Fantasy genre so many years later...but I can't help but look at this now and think..."That would make a perfect Icewind Dale Icing Death lair!!!"
If your an R.A. Salvatore fan, you'll see it too..... 


A little professional-level inspiration is never bad. This image comes from miniaturewargaming.com and just completely captures what I hope to one day achieve. To be that cooky elderly gentlemen who recreates ridiculously detailed mythical battles of yore at an age where I no longer care what society (or the oppositte sex) think of me as I stride proudly through public in pre-14th century garb, and for some reason speak with an English accent. I'll likely stand atop a crows Nest on my gaming guest house and yell nautical terminology at random intervals as well. And perhaps fire a cannon on the hour. 


This reminds me of the "spinning wheel of death" thing from the film Labyrinth from the 1980's starring David Bowie. It has that same, Fantasy-feel with a bit of mechanical, almost steam-esque feel to it. I have no idea where I found this, nor what I was saving it for other than pure inspiration, so my apologies to the very talented artist and creator of this imagination-capturing model. Household junk can be a tremendous source for creative traps, gadgets, characters, and in-game scenarios. I once ran a campaign lasting several sessions where the objective for the players was to stop a world-eating mechanicus device made from old bike parts, a disected watch and a silver painted q tip. It's possible that it is somewhere still in the deepest bowels of my gaming supply dungeons,  ready to "go off" at any moment.  


I am sure I am not the only geek who thinks about Halloween costumes year round...but I am sure I am not the only one who looks at this and thinks it could make a far better "Cuthulu" costume as well...


These are completely hand made. Well, everything except the sword and dagger. The sword is the Sword of the Witch King from the LOTR, and the Dagger is the Morgul blade which stabbed Frodo atop Weathertop. But the sabotons and gauntlets were assembled, hammered, riveted, and blackened by me in a simple backyard fire-pit and on a bit of old railroad tie used as an anvil. The advantage of creating the perfect NAZGUL costume is that errors can be plenty and be easily hidden under the guise of age and ware. After all, what condition would one expect of armor worn constantly...for ages...by the servants of Sauron?   

Smaug's "melting" Horde? Or...Dragon Vomit?

Ok, so the "Smaug's Horde" project is moving slow, and as of last night, not....quite as well as I had hoped.
The use of hot glue, while so so very good for so many RPG tabletop projects, may not have been the ideal solution. I am finding the paint work quite difficult to capture the "flowing gold" feel while still retaining a sense of "individual shape" to the mass-in other words, it is supposed to look like a pile of coins right, not a massive Ochre Jelly that swallowed a treasure horde.
Now the images here are of course, pre-completion, and this is the first coat of Antique Gold acrylic, so there is no shading, dry brushing, shaping, etc, and quite a ways to go, but its beginning, thanks to adding a bit of metallic gold dry brushing on one end, to at least resemble the possibility of a treasure horde.... Time will tell...
For now though,  it does look like a small pile of dog vomit doesn't it?
Ya.....


Smaug's horde...well...sort of...part I

I read an article once, likely sometime after the release of the second Hobbit film in Peter Jackson's trilogy, that tried to direct the amount of gold actually in Smaug's horde.
It was astronomical. Ludicrous. More gold than had ever been mined in all the earth...or something like that. Far too much to re-create for any creative geek like myself.
So I needed to create a more manageable size horde for modular table top use, and to create a sizable treasure pile that matches the size of the miniatures I currently own. After all, why do I need a "Smaug-size" treasure horde when I have yet to acquire a "Smaug-size" dragon - see Wizards of the Coast Colossal Red Dragon for example ($300...wow...really?).

while I have a fairly good selection of these winged beasts, my largest is the Wizards of the Coast Black Dragon, and while VERY large in comparison to the other standard-size player character miniatures fromWizards and Wizkids, it fails, somewhat ridiculously so, in comparison to the size of the Colossal Red. But it is plenty large for my smaller sized gaming table, area, storage space available, and thus, treasure horde. 
As for other Dragons, Tiamat seems like she would have greater aims then to amass treasure, and this treasure project model will be plenty large for the Wizards of the Coast Dragons Collectors set with large versions of Red, Black, White, Green and blue dragons.

One thing I did NOT want to do from the inception, is have a wide, low pile. I have created treasure piles before from bits of metal, glass, and old costume  jewelry, but I wanted this one to be different. More "epic" to go with some of the new projects I have created of late really focusing on intricate detail and realism. No, this horde needed to ahem height...like when Bolbo slid down the treasure pile like a mountain after the arkenstone...mass. Steepness and a size large enough to attract the attention of even the most fool-hardy of adventurers. 

Early stages:
I started with a cut cardboard base with glued glass round vase beads. these glass rocks come in small bags at just about every dollar store Ive ever seen. I went with clear to ensure that the colors would not necessarily show through the mass of hot glue I would be using atop. For the "base" I wanted to avoid too much color, and save the rainbow flashes of jewels for the top if the horde.
Additionally, I stacked large brooch style costume jewelry pieces on top of those, almost making a "junk pile" of sorts and covering each section with an ever increasing mass of hot glue. I used all temperature hot glue six, allowing some areas to dry harder than others, some to drip and ooze for various effects I will detail later. I have found that high-temperature hot glue six tend to mold into themselves too quickly, and leave you with a large, albeit wide, gooey pile. Wonderful for creating slimes, oozes and jelly's, but not for structures, shapes, or mass.


As the glue hardened and the mass began to take shape, I began to add various beads of color, shape and size. Beads work well because they do not appear as "beads" when the holes are placed at the right angle, they are colorful, cheap, and accessible. Along with this I added more visible pieces of costume jewelry cut with metal pliers into everything from scraps of gold and silver to great spheres of black and even pearls, emeralds, amethysts, ruby's and diamonds. The back of a cheap piece of costume jewelry served well as an upright shield buried in the foreground of the pile too, just about the right size for a 28mm character figure.


Two notes I noticed in the construction here:
1 - Too colorful of beads and it started to look fake. Some of this area here will be painted over with gold metallic and antique gold paint, to reduce the "whimsical" colors here.
2 - The glue needs to be taken right to the edge of the cardboard base so as to avoid a "base" look. I want this to look as if it is sitting on any potential surface. This small exposed lip of cardboard here in the foreground will need to be added to with additional glue and accessories to enhance the look of an overflowing pile, as opposed to a pile on a base. 

Next, gold coloring, wash and dry brushing, and adding final gems, jewels and treasure pile accessories... 


Caverns of the Under-Table

Perhaps it's the winter. The mist. The clouds rolling in over the south-western Ochre mountains here or just that same old "calling" that comes on the wind throught the fall and winter that I have heard my whole life that I have never been able to define, but there has been a tremendous amount of creation going on in the deep dark depths of the (Ursus Templari - yes, still deciding on a proper name....long history surrounding that bit...).

Having purchased the Gale Force 9 Caverns of the Underdark adventure set, I wanted to match the terrain to not just the vinyl Underdark mat produced by GF9, but to the actual terrain models themselves.


http://www.gf9.com/Default.aspx?tabid=348&art_id=3310

So the key was to match hand-crafted terrain pieces with the color, look, feel and outline of the GF9 ones. I'd done this before, and found that Citadel Paints "Fenris Grey" worked well with dabs of purple to capture the sense of dripping cave algae or fungi. I wanted a true seamless piece, complete with crystals, black-purple still water pools, and a real sense of similarity.


There was one other caveat too. I wanted it modular. I already had the GF9 cavern pieces I could use just about anywhere, but I needed mine to be portable, storable in the small gaming tower of the Ursus Templari, and easily accessed for potential gaming (someday). Where could I create a large scale cavern with columns, pools, walls, rolling flowstone and yet still, encompass a complete environment? 
I started looking in places I already had.....midden places, and things maybe I "missed" in the past....like the underside of a table.
Yes, the UNDERside for a perfect UNDERdark....er, uh...the "Under-Table."
The entire table was first sprayed in a "base" coat of generic primer grey. I added dabs with a standard utility brush, allowing the bristles to spread and stretch dry-brush style to create the "blotchy" black and even deeper laid tones of brown to give some depth to the base floor. Stone or natural marble-esque look.
Following the base coat, the walls and "flowstone" was created with grey cement caulk from my local big box store. Cheap caulk, about $3, and a $4 caulk gun. Enough to do far more than what I needed. 
The flowstone caulk was laid on the edges of the table inside, to create a "border" for the natural "walls" of this large cavern complex. By bringing the depth of the walls out it created natural formations allowing the caulk to sort of just ebb and flow and using a small metal pick to manipulate the texture and flow of the caulk. 


I added in small broken fragments of slate tile I had left from a previous bathroom tiling project which when put together with the natural grey cement caulk gave depth, stairs, and accents to the corners to sort of "round out" the harsh edges of the vertical walls of the tables inside bottom. These also made for perfect borders to create the small pools. 


Once this was completed, came the painting of the caulk and flowstone. This was the most time-consuming portion, as the light grey needed to be first painted in several layers of grey and blue to achieve the depth to each section of flowing caulk. Once that was colored to match, the walls were dry-brushed with lighter grey again to bring out highlights, and a black water base was added to finish it off and fill in small holes and shadows.
The final step was to paint in the black "background" caverns, and shape the shadowing around each piece of flowing cave stone. But while this was painstaking and extremely time consuming, the black shadowed background really made it feel like a true "cave" system, with any number of potential monsters and enemies lurking in the dark just out of sight.....


The pools were created using clear glass glue from the local hobby store, and then allowing to dry. I then painted with a watered-down purple-black hue in acrylic paint, allowed to dry, and dry brushed with a gloss varnish. this added the shiny wet look that m,watches that of the pools from Gale Force 9. I followed this same procedure with bits of broken sea glass purchased from the local dollar store that is designed to be used inside flower vases. When the clear glass was painted with the watered down purple acrylic, light was still able to show through. This allowed me to fix it to the caulk walls, and gloss varnish the painted glass for the look of giant purple crystals emerging from the natural flowstone. Again, mimicking the matching look of the Gale Force 9 Underdark crystals and keeping with the grey-purple hued theme.  


Lastly, I added gloss varnish to smalls sections of the dried and painted caulk material to give the entire cave system a wet look. 
Matching with the GF9 set was pretty close, although of course not perfect. But perhaps the small imperfections add only to the variety and variances of a real natural cave system. 


Next....treasure......


The Tower, the Green Dragon, the Eagle & Child?

There is a structure on my property, down a winding stone path and under the arching branches of blooming Russian Sage, old oak and rising quaky Oaks, hidden from view by large wooden doors, encrusted with the age of years and iron bolts....
It is an unfinished structure, but its outward appearance is one of pure imagination. The Upper room, a ship ladder accessed loft of sorts, is set to be a small, but amazing looking gaming area, complete with round windows, natural light, and a decent sized table. 
Wood beams, dark wood floors, slanted cedar ceilings, and vintage artifacts, games and dice everywhere...pictures coming in a future blog post...


The end goal is to create a space that is brimming with imagination and overflowing with adventure to invite future gaming...but....there is not as of yet a group associated with this locale, and it doesn't yet even have a name.
The Green dragon?
The Prancing Pony (from the Fellowship of the Ring)
The Tower?
The Eagle & Child (the Pub where JRR Tolkien and CS Lewis met with the Inklings to discuss the works that would later become the Lord of the Rings and the Chronicles of Narnia...)
The Ursus Templarrii (the Templar bear, Latin for family clan heraldry)
The list of potentials goes on and on....
But the real key is going to come when a group of dedicated players is sought...

Despite the many wonders of the 'inter web,' I am not seeing a very productive method of acquiring new players, especially ones that are of an older, let's say, 'Advanced D&D' to at the latest, '3.5 edition' level and maybe even 4 or now, version 5 (which I love btw). Ad to this the difficulty of finding those devoted enough to play with any regular consistency and it makes it even tougher. So the idea has come up to possibly just do a simple old-fashioned 3x5 style card, well designed of course, that says something to the effect of the following:


ADVENTURERS WANTED!
+++The Ursus Templari Adventuring Club +++
Experienced Dungeon Master 
seeks dedicated group of adult players for new D&D & AD&D campaigns (possible D&D Next) 
set in Forgotten realms and/or Flaness. Game sessions held in private gaming inspired loft guest house.
Detail oriented, miniature-heavy table top role-playing with emphasis on storyline, not mechanics. 
Seek creative, experienced players who live their characters. 
Do you have the adventuring qualities needed?
  • You know what "Mazes and Monsters" is
  • You likely own a cloak, sword, shield or helm of some form.
  • You know (and remember) who Strongheart the Paladin is.
  • You know whether or not you should chose the path through the giant devil-shaped mouth
  • You could find the Nyr Dyv on a map (and know which map that is...)

 If you answered no, do not fret, but a willingness to learn and a love for vintage D&D game play is a must. We seek consistent sessions, devoted players, and a sense of old-school adventuring fun and story telling.  
Contact Elrik at creativedungeoneering@gmail.com for more information.

+++
Funny, I doubt I'll ever put this up.
I just wonder what kind of gamers would know the answers to all of these.....Surely there are some out there...somewhere..."Is anybody...out there...?" to quote the immortal Pink Floyd....